
How To Add USDT To Metamask Wallet?
Learn How to Safely Add Tether (usdt) to Your MetaMask Wallet and Expand Your Crypto Portfolio
By reading the article “Importing USDT to MetaMask Guide” published in Adaas Investment Magazine, you will be fully familiar with the easiest methods to add and manage the Tether Token known as USDT to your Metamask wallet! This level of familiarity can be enough when you need educational information about this topic.
Are you ready to take your cryptocurrency transactions to the next level? If you’re familiar with the world of digital assets, you’ve probably come across USDT (Tether) and MetaMask. In this comprehensive guide, we’ll walk you through the process of adding USDT to your MetaMask wallet, empowering you to seamlessly manage and interact with this stablecoin.
Why Add USDT to MetaMask?
Now that you understand what USDT and MetaMask are, let’s dive into why combining these two powerhouses is essential for your cryptocurrency transactions:
Seamless Integration: Adding USDT to MetaMask allows you to seamlessly integrate this stablecoin into your existing wallet, giving you a unified platform to manage all your digital assets.
Enhanced Accessibility: With USDT in your MetaMask wallet, you gain access to a wider range of decentralized applications and services that accept USDT as a form of payment.
Simplified Trading: USDT’s stability combined with MetaMask’s trading features empowers you to easily trade, buy, or sell USDT against other cryptocurrencies within the MetaMask ecosystem.
Diverse Investment Opportunities: By adding USDT to MetaMask, you open up a world of investment possibilities. You can participate in decentralized finance (DeFi) protocols, stake your USDT to earn passive income, or even lend it to others for interest.
In the following sections, we’ll provide you with a step-by-step guide on how to add USDT to MetaMask, ensuring you can tap into the full potential of this powerful combination.
Table of Contents
Step-by-step Guide on Adding USDT to MetaMask
In this guide, we have provided you with two methods to import the Tether token to your Metamask wallet. The first method is the easiest and safest way to do this process and we suggest it to beginners to prevent any mistakes in the process of adding tokens to the Metamask wallet.
1- The Simplest Way For Beginners:
If you’re looking to effortlessly add a token to your MetaMask wallet, we’ve got you covered. Follow these straightforward steps to import any compatible token into your MetaMask wallet with ease:
Step 1: Install and Activate MetaMask Wallet
Start by installing the MetaMask wallet extension in your browser. Once installed, activate the wallet by following the setup instructions provided. Creating a new wallet or importing an existing one is a breeze with MetaMask.
Don’t Worry! In the following sections, we have placed a comprehensive step-by-step guide to installing the Metamask Wallet extension for your browser.
Step 2: Add the Host Network
To ensure seamless compatibility, you need to add the appropriate network to your MetaMask wallet. For example, if you’re adding a BEP20-based token, such as BNB or BUSD, you’ll need to add the Binance Smart Chain network to MetaMask. This network addition is essential for successful token integration.
In this guide we have selected Ethereum Netowork to host USDT token, otherways you need to add your desired new network to your Metamask Wallet!
We’ve Got You! If you do not know how to add a new network to your Metamask wallet, we have published a comprehensive guide to adding the Binance Smart Chain network to Metamask for a practical example.
Step 3: Search for Your Desired Token
Head over to coinmarketcap.com, the popular cryptocurrency information platform, and search for the token you want to add. In this guide, we’ll use USDT as our example.
Step 4: Access the Token’s Contract Details
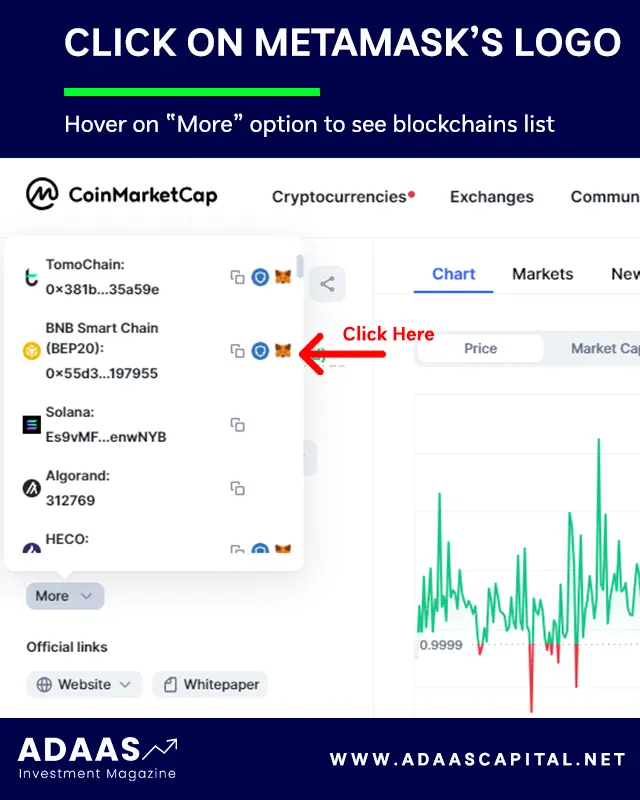
Once you’re on the USDT page, scroll down on the left side until you reach the “Contracts” section. Hover over the “More” option, and a list of blockchains supporting the token will appear. Here’s where the magic happens!
Step 5: Click on the MetaMask Logo
In front of each blockchain listed, you’ll see three options. Look for the one that features the MetaMask logo and click on it. This action will initiate the token import process to your MetaMask wallet.
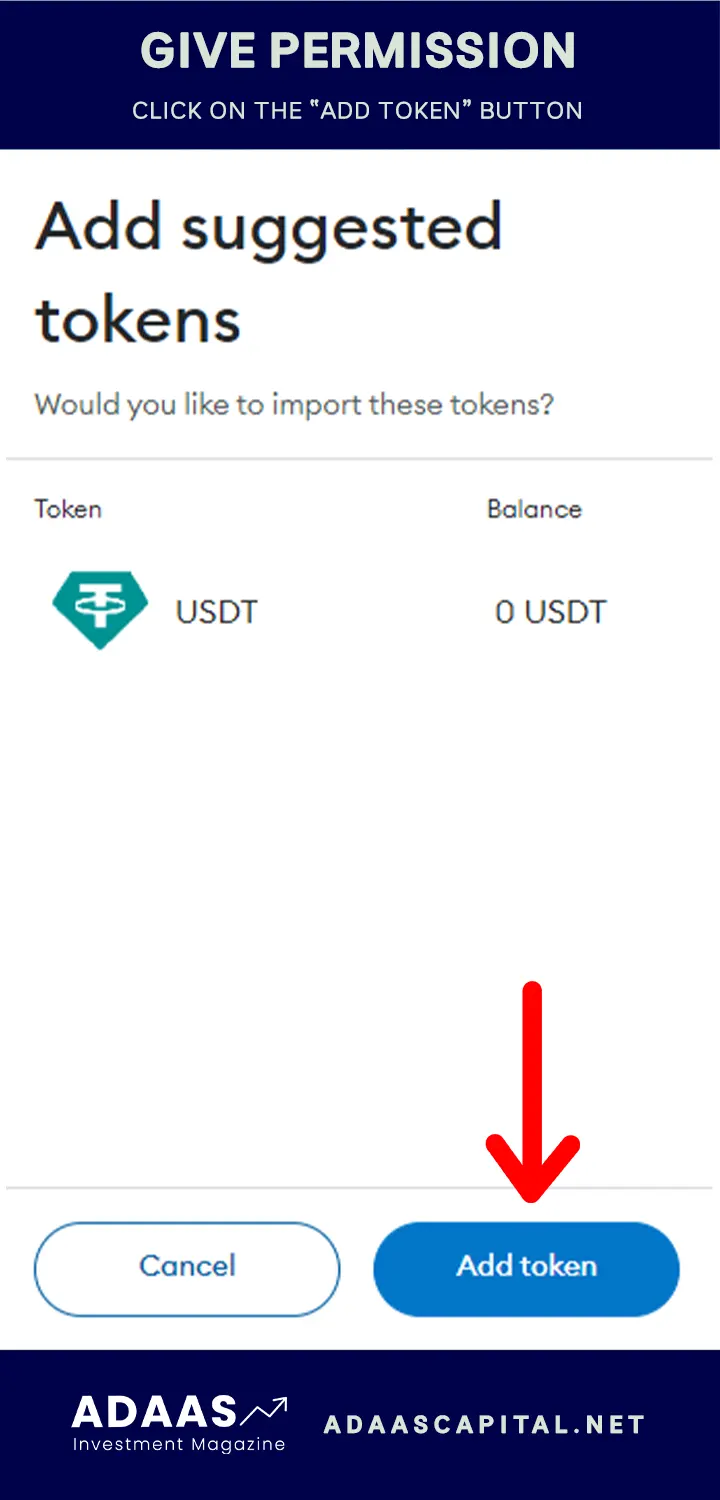
Step 6: Confirm the Token Addition
MetaMask will display an alert, confirming your intention to add the token to your wallet. To finalize the process, simply click on the “Add Token” button, and voila!

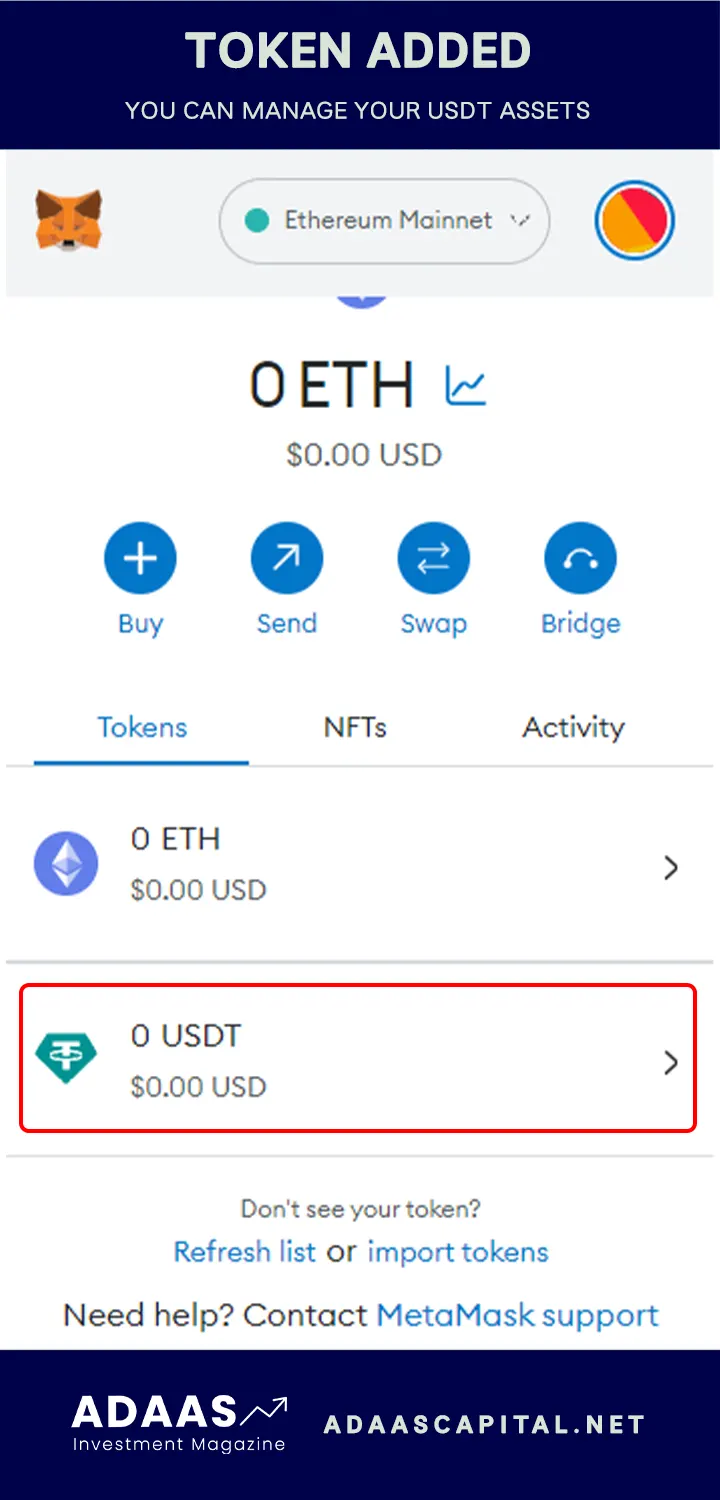
Congratulations! You have successfully added the USDT token to your MetaMask wallet. You can now manage and track your USDT holdings alongside your other digital assets. Enjoy the convenience and flexibility that MetaMask provides for your crypto journey.
Dear Mobile Users! You also can follow this instruction on your mobile. All you need to do is install both Metamask and CoinMarketCap applications!
2- A method for experts:
Adding Tether Token to your MetaMask wallet is a straightforward process that allows you to manage this stablecoin alongside your other digital assets. Follow these simple steps to seamlessly integrate USDT into your MetaMask wallet:
Step 1: Install and Set Up MetaMask
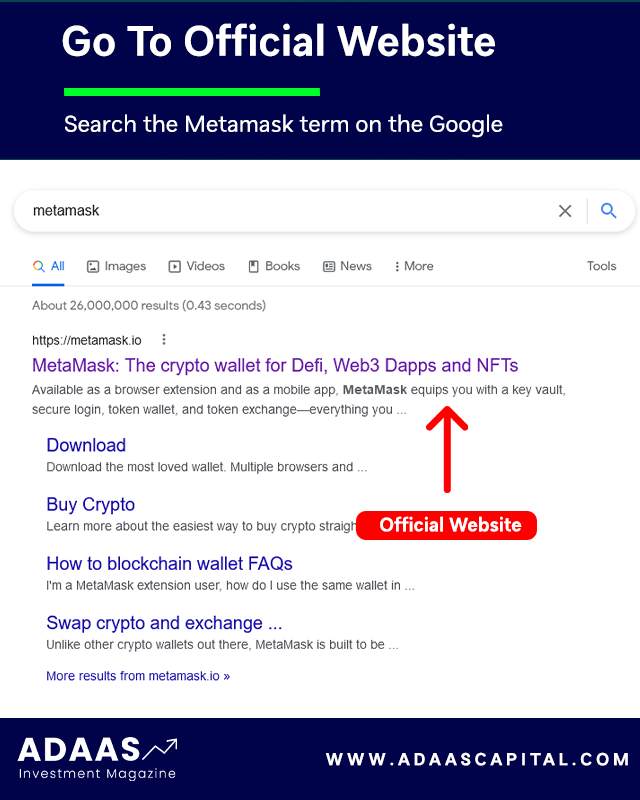
If you haven’t already, start by installing the MetaMask browser extension or mobile app. Visit the official MetaMask website and follow the instructions for your preferred browser or mobile platform. Create a new wallet or import an existing one by securely entering your seed phrase.
To install the Metamask wallet for desktop or mobile devices, the best way is to visit the official website at www.metamask.io and You can also Google the name of this wallet and finally enter the Metamask wallet official website. On the main page of this website, the Download Now button will take you to a page from which you can download the software version suitable for your mobile or computer.
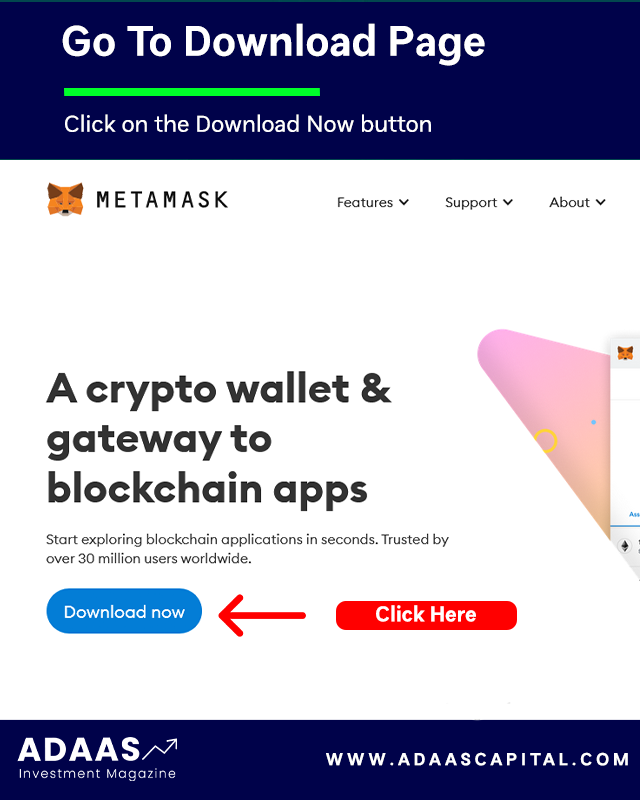
On the Download page, your device’s operating system will be automatically detected and the download option will be displayed. Of course, if needed, you can also download and use the versions of other operating systems.
Metamask Wallet is developed and can be installed for Android, iOS and Chrome, Firefox, Brave, and Edge browsers.
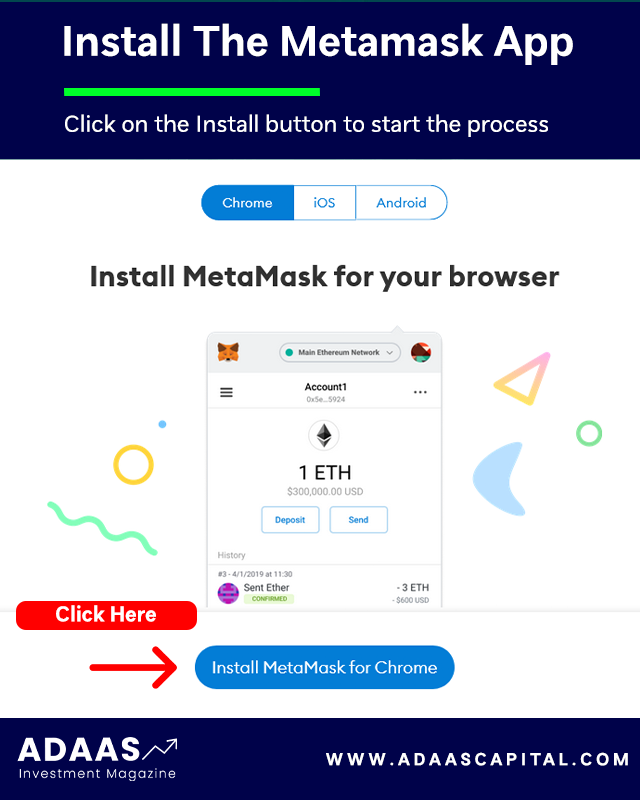
For example, in this tutorial, we will install this wallet for the Chrome browser. After clicking on the “Install MetaMask for Chrome” option, we will be redirected to the official installation page of this extension.
Then on this page, we click on the “Add to Chrome” button and it asks us for permission to install it, and to do this, we click on the Add Extension button, and finally, the message that the MetaMask extension is successfully installed will be displayed to us.

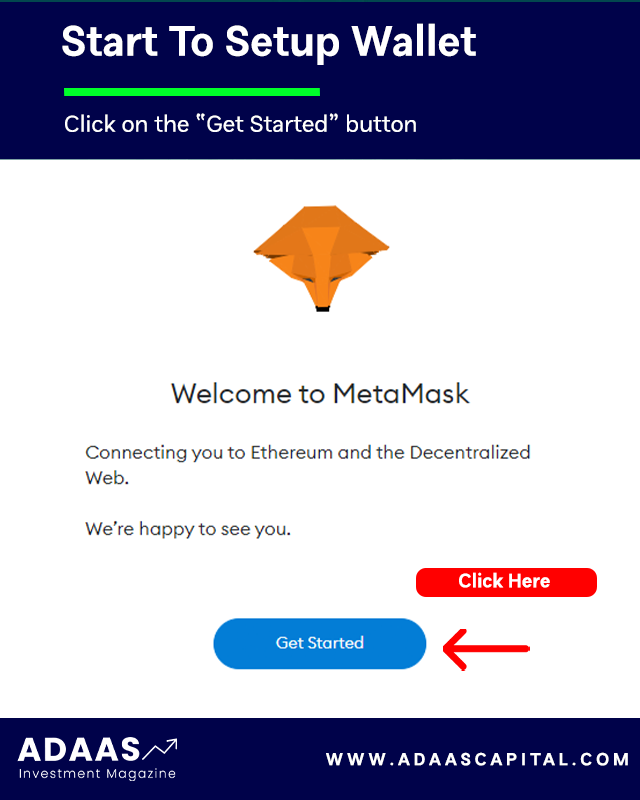
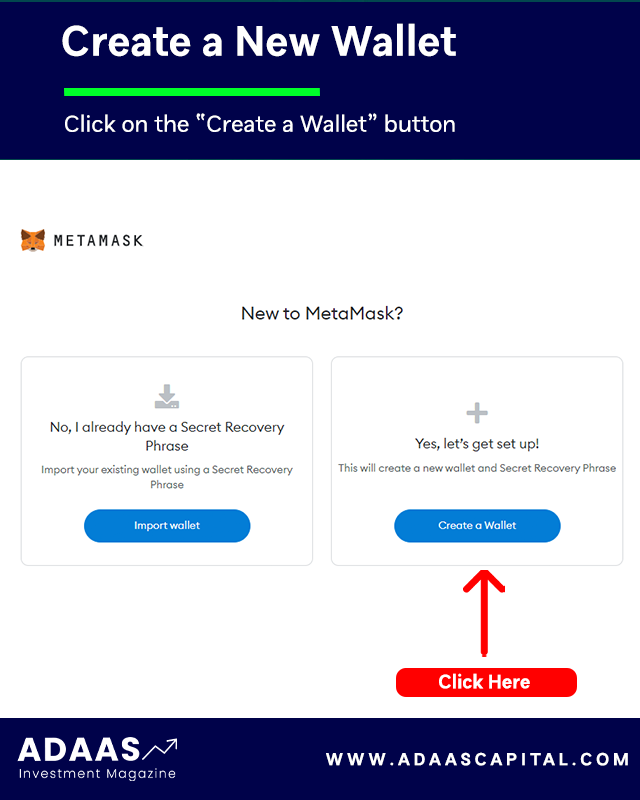
By clicking on the Metamask logo in the Chrome browser extensions section, we will enter a page that starts the setup process by clicking on the “Get Started” button. On the new page, you will be asked to select:
- Left option: Import an existing wallet by its recovery phrase.
- Right option: Create a new wallet for you.
In this tutorial, we want to create a new wallet for ourselves, so we select the right option, Create a Wallet.
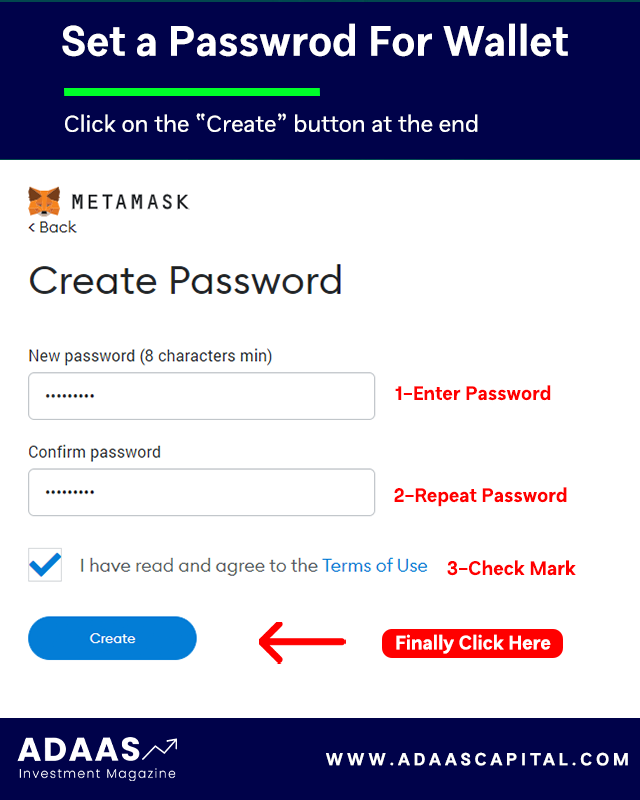
The new page asks you for access to grab information such as pages visited in the software by users (Page Views) to collect and analyze them, and to apply optimizations to improve the user experience. Also, you can select the “No Thanks” option if you do not want to allow it.
Next, you need to enter a strong password to log in to the Metamask wallet and re-enter it in the second field to confirm it, and finally check the Term of use option and at the end click the Create button.

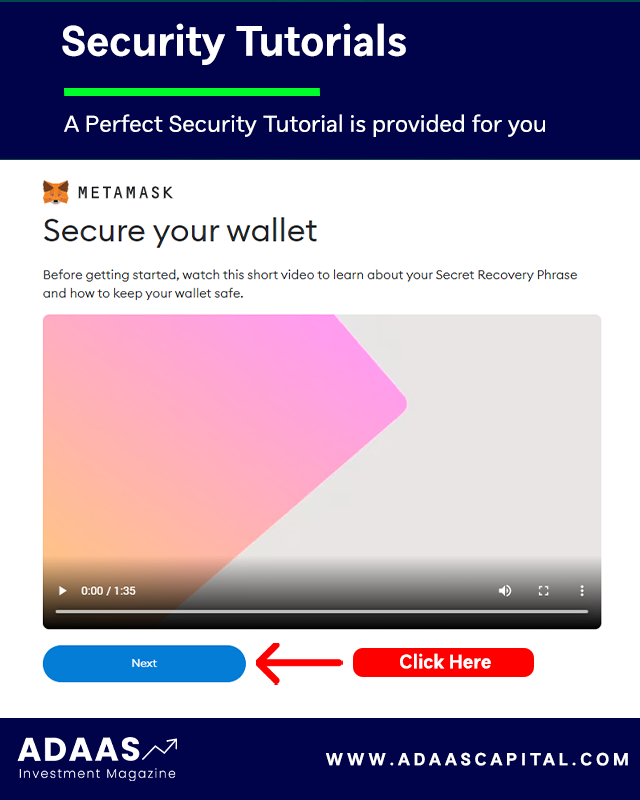
A tutorial has been prepared for you to provide more security for the Metamask wallet, which you can view if you wish so that you can learn valuable tips for free therefore you can keep your wallet safe and secure from possible attacks by hackers or thieves.
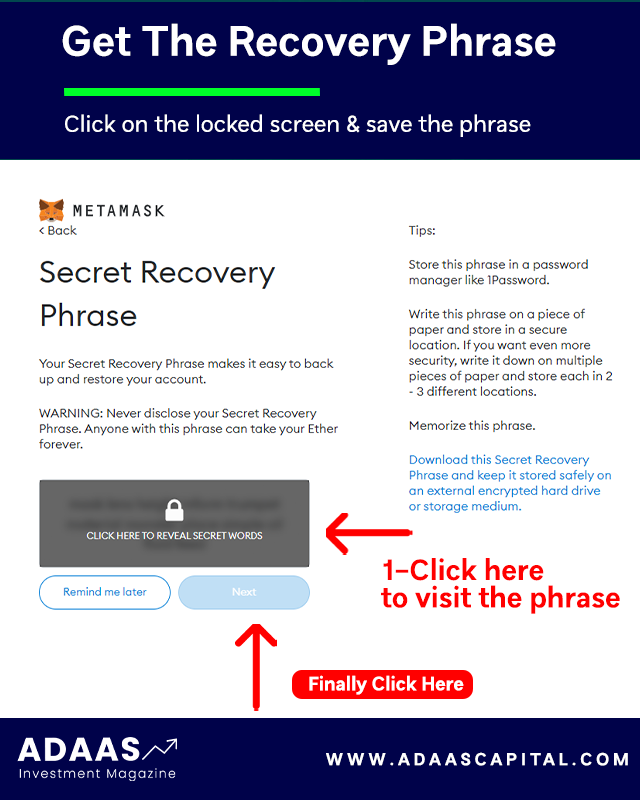
After viewing the tutorial, you will enter a very important page that displays the wallet recovery phrase for you. Keep these recovery words in a safe place so you can use them to recover your wallet if needed.
Note that access to wallet recovery phrase is equivalent to access to all digital assets stored in that wallet, so it is best to be diligent in keeping it secure!
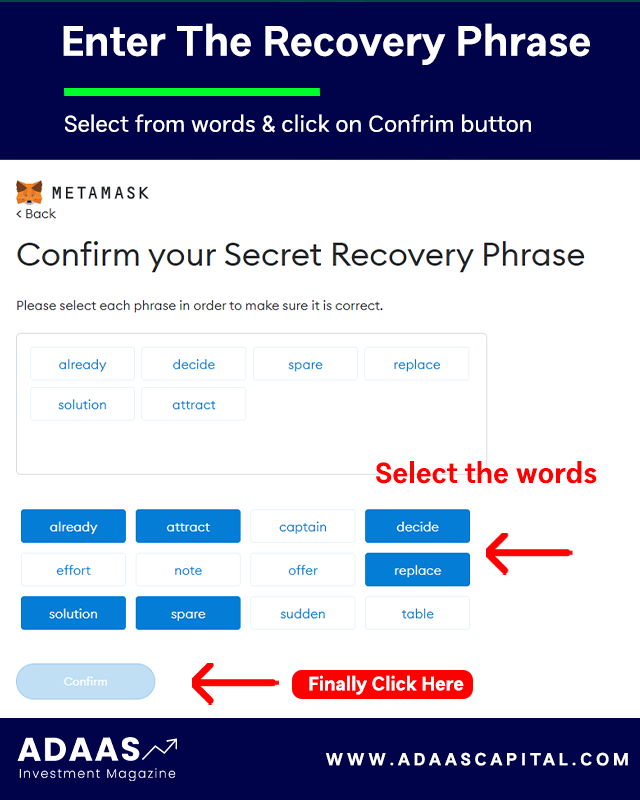
After noting the recovery phrase, click the Next button to be redirected to the page where you want to enter them. On this page, you have to enter the 12 recovery words that you wrote down in the previous step and finally click the Confirm button.
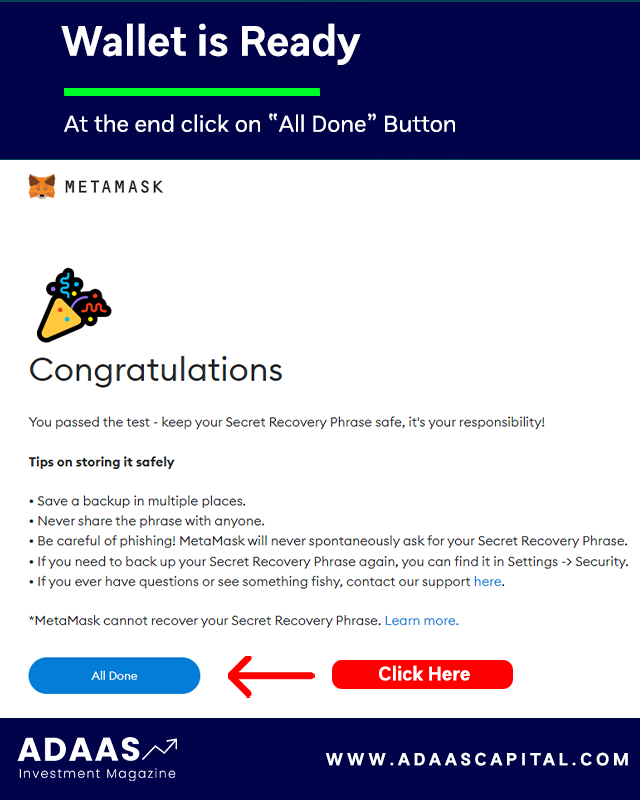
If you have done all the steps correctly, you will be presented with a congratulations page, which means your wallet is made by Metamask software. After clicking on the All Done button, you will be directed to the Metamask wallet software environment.
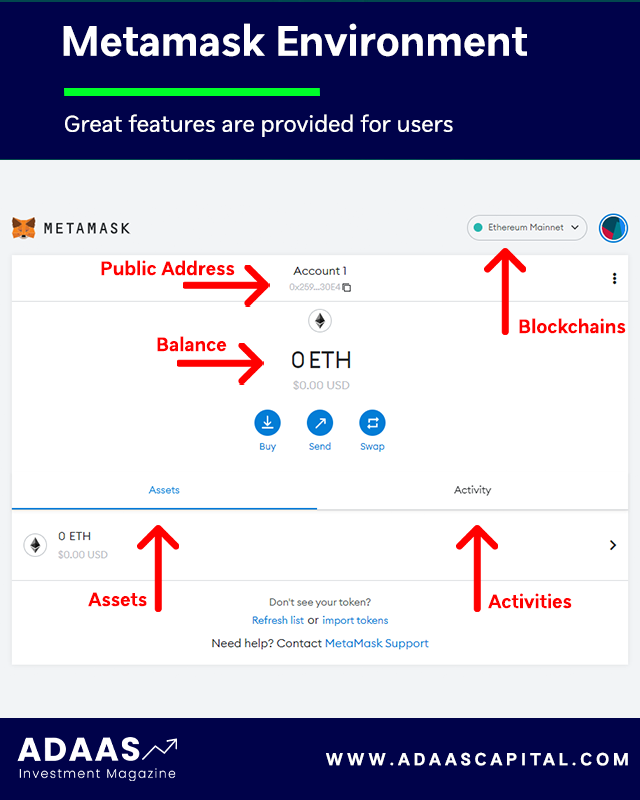
This page displays information such as the type of blockchain, the amount of assets stored, past activities, the public address of the wallet, the button to add tokens, and other features.
Note that the steps we went through are the same for installing and launching Metamask wallet on other operating systems such as Android or iOS, and you can use this tutorial to install Metamask wallet on mobile as well.
Step 2: Navigate to the Tokens Tab
Once MetaMask is set up, open the extension or app and navigate to the main dashboard. Look for the “Tokens” tab, usually located at the bottom of the screen. Click or tap on the “Tokens” tab to proceed.
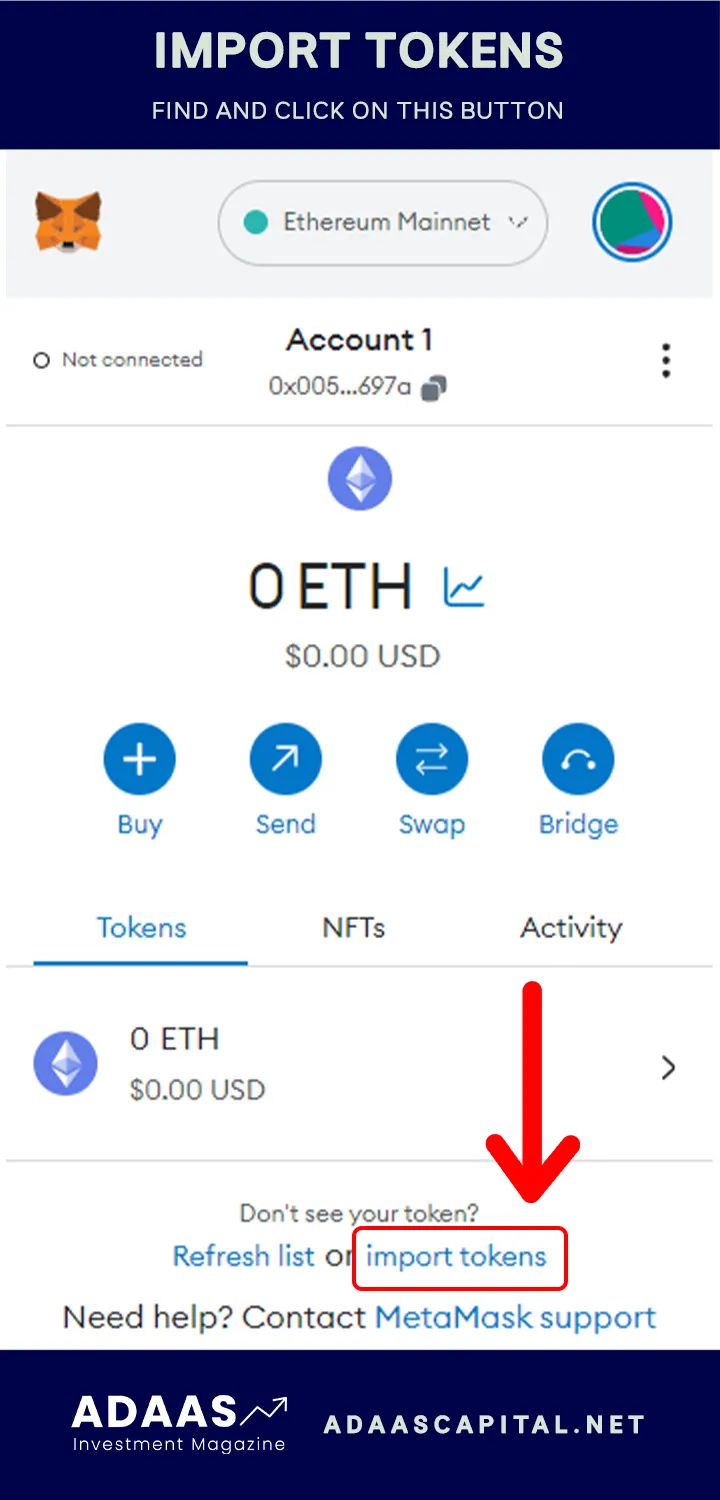
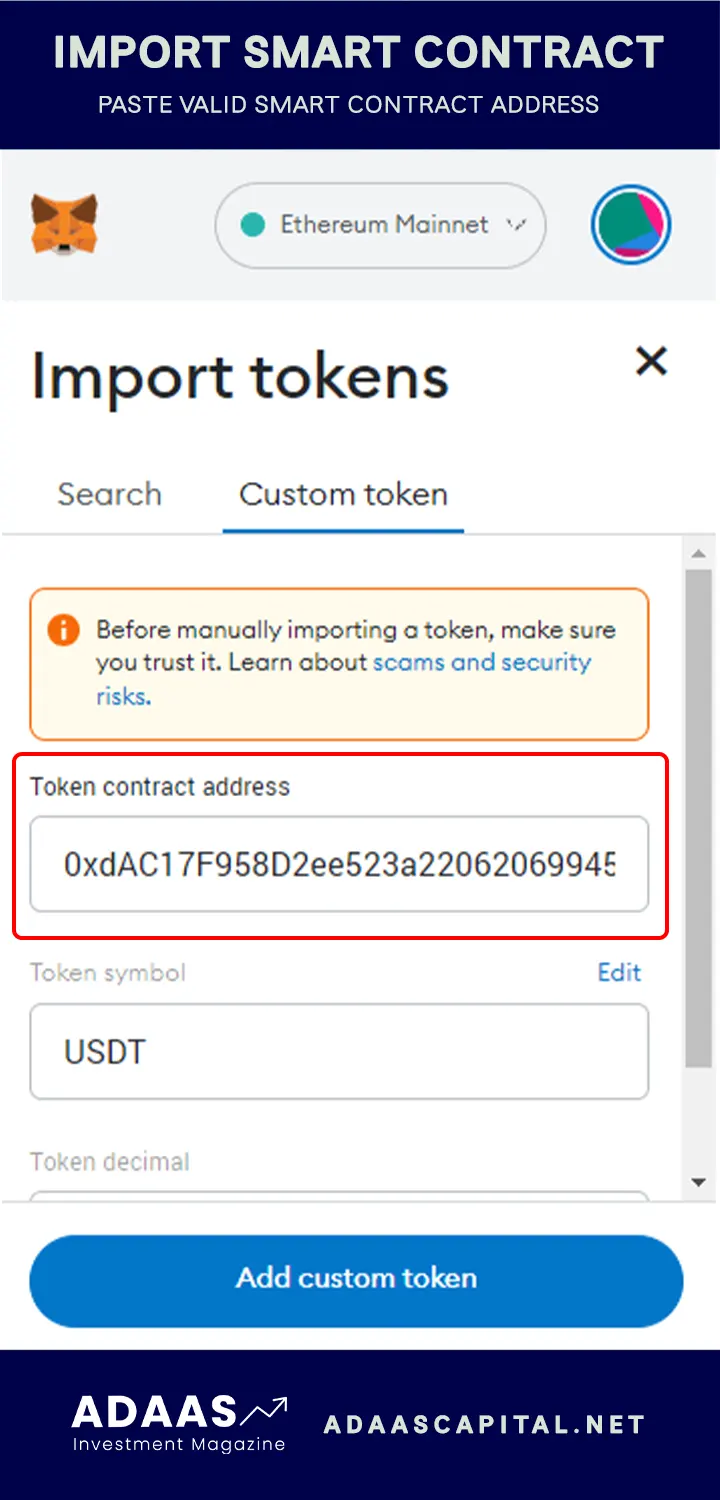
Step 3: Add a Custom Token
In the Tokens tab, you’ll see a list of tokens that are already supported by MetaMask. To add USDT, we need to input its contract details. Locate and click on the “Add Token” or “Custom Token” button. This will open a form where you can enter the contract details.
Step 4: Input USDT Contract Address
To add USDT as a custom token, you’ll need to input its contract address. For example, the contract address for USDT on the Ethereum blockchain is [Click Here]. Copy and paste this address into the relevant field in the form. MetaMask should automatically fill in the token symbol (USDT).
Good News! Metamask Wallet has added a new feature that you can search for tokens instead of adding by importing smart contracts. This feature is now available for Ethereum Blockchain!
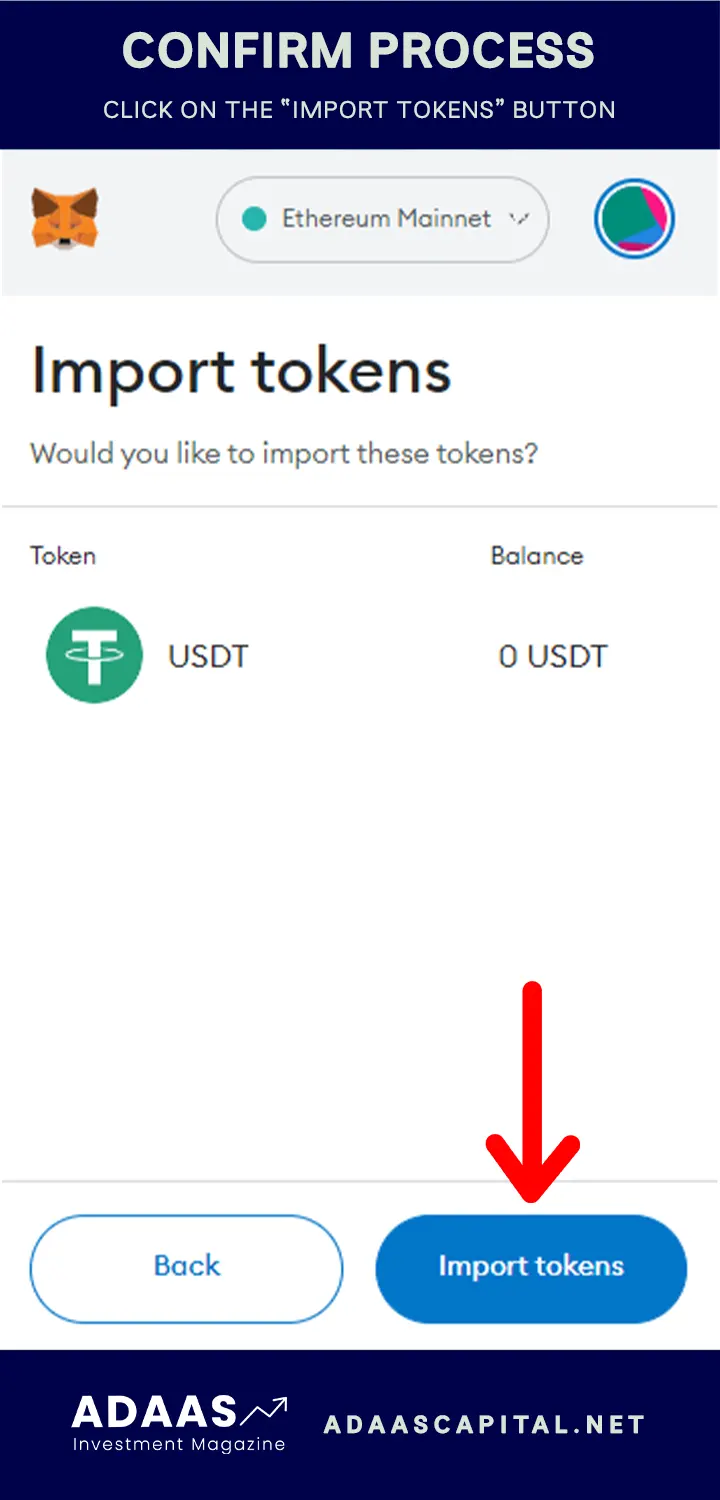
Step 5: Confirm and Complete the Process
After inputting the USDT contract address, double-check that all the details are accurate. Click or tap on the “Next” or “Add” button to confirm and complete the process. MetaMask will ask for your confirmation to add the USDT token to your wallet. Approve the request, and within a few moments, USDT will be successfully added to your MetaMask wallet.
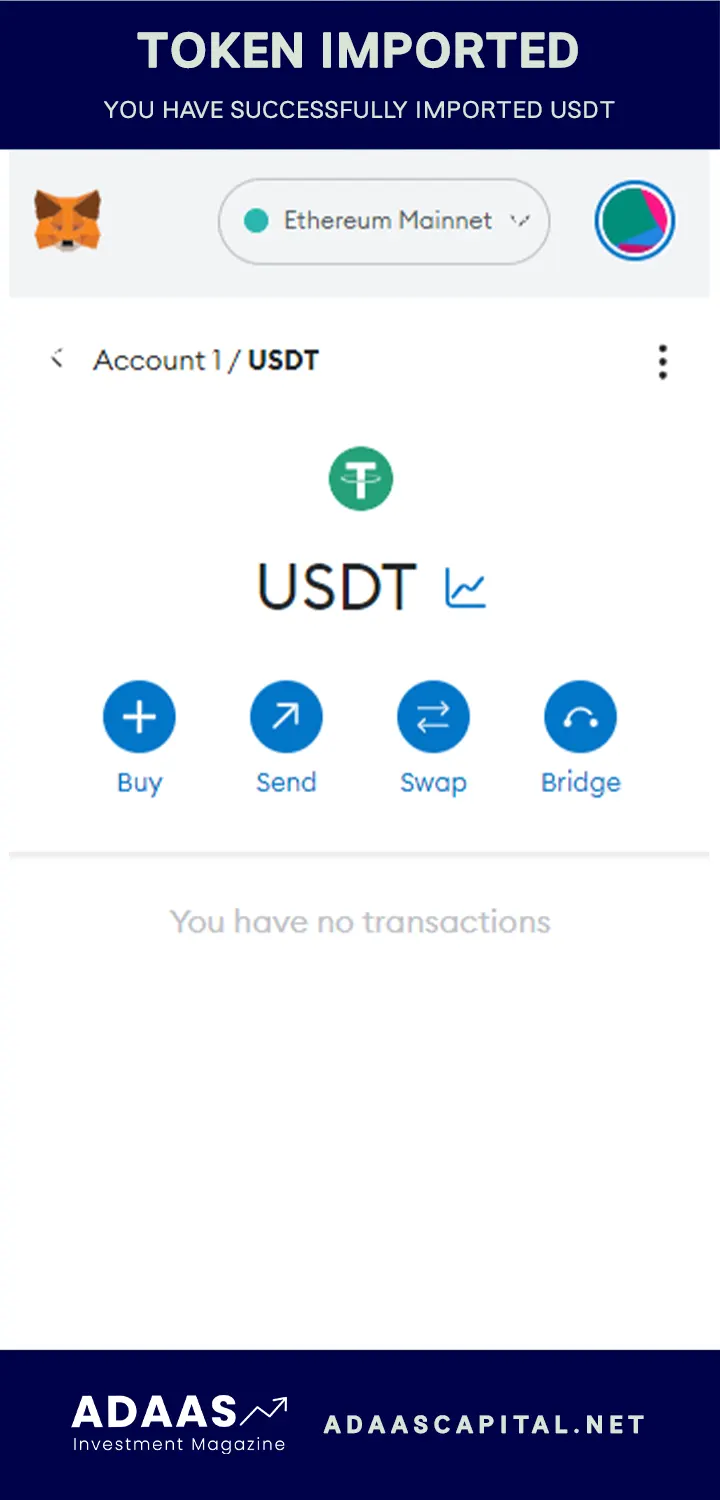
Congratulations! You have now added USDT to your MetaMask wallet, allowing you to view and manage your Tether holdings alongside your other cryptocurrencies. You can check your wallet balance, send USDT to other addresses, or utilize USDT in decentralized finance (DeFi) platforms, all within the secure and user-friendly MetaMask environment.
Remember to always verify the accuracy of the contract address and details when adding custom tokens to your MetaMask wallet. In case of any updates or changes to the contract, refer to official sources or the USDTissuer’s website for the most up-to-date information.
Tips and Warnings
Successfully adding USDT to your MetaMask wallet requires attention to detail and awareness of potential pitfalls. Here are some valuable tips to ensure a smooth process, as well as warnings about common mistakes and scams to avoid:
Tips for Adding USDT to MetaMask:
Verify the Token Symbol and Contract Address: Double-check the token symbol and contract address when adding USDT to your MetaMask wallet. Scammers may create fake tokens with similar names to deceive users. Always ensure that you’re adding the legitimate USDT token.
Use Reliable Sources for Token Information: When searching for the USDT token within MetaMask, rely on reputable sources to obtain accurate token information. Visit the official USDT website or consult trustworthy cryptocurrency platforms for the correct token details.
Keep Your Seed Phrase and Private Keys Secure: Safeguard your MetaMask seed phrase and private keys. These are crucial for wallet recovery and should be stored offline in a secure location. Never share them with anyone, as it can compromise the security of your funds.
Regularly Update MetaMask: Stay up-to-date with the latest version of MetaMask by regularly updating the browser extension. Updates often include important security enhancements and bug fixes, ensuring a safer and smoother user experience.
Explore Additional MetaMask Features: MetaMask offers a range of additional features beyond managing your digital assets. Take the time to explore functionalities such as decentralized finance (DeFi) integrations, NFT marketplaces, and browser-based games, expanding your crypto horizons.
Warnings about Common Mistakes and Scams:
Beware of Phishing Attempts: Exercise caution when interacting with MetaMask. Be wary of phishing attempts where malicious actors impersonate MetaMask websites or support teams to obtain your sensitive information. Always verify the authenticity of the website and double-check the URL before entering any personal or wallet details.
Avoid Sharing Your Seed Phrase or Private Keys: Never share your MetaMask seed phrase or private keys with anyone. Legitimate wallet providers or support teams will never ask for this information. Sharing your seed phrase or private keys can result in the loss of your funds.
Be Cautious with Third-Party Websites and Services: When interacting with third-party websites or services that integrate with MetaMask, exercise caution. Ensure that you’re using reputable platforms and conducting thorough research to minimize the risk of scams or fraudulent activities.
Double-Check Transaction Details: Before confirming any transactions involving USDT, carefully review the recipient address and the amount being sent. Mistakenly sending funds to the wrong address or entering incorrect amounts can result in irreversible loss.
By following these tips and staying vigilant about potential scams, you can add USDT to your MetaMask wallet securely and efficiently, harnessing the power of this stablecoin within the MetaMask ecosystem.
What is USDT?
USDT, short for Tether, is a stablecoin that has revolutionized the cryptocurrency landscape. Designed to provide stability in an otherwise volatile market, USDT has become one of the most widely used digital assets. Let’s take a closer look at what USDT is, its uses, and its significance in the crypto world:
Stablecoin for Stability: USDT is a type of cryptocurrency known as a stablecoin. Unlike other cryptocurrencies, whose values can fluctuate wildly, USDT is designed to maintain a stable value. Each USDT token is pegged to the value of the US dollar, meaning that 1 USDT should always be equivalent to 1 US dollar. This stability makes USDT an attractive choice for those who want to transact in digital assets while minimizing the risk of price volatility.
Widely Accepted and Used: USDT’s popularity stems from its widespread acceptance and use across various cryptocurrency exchanges, platforms, and services. It has gained broad adoption as a trusted medium of exchange and store of value. Traders, investors, and individuals worldwide rely on USDT for its reliability and ease of use.
Facilitates Seamless Transactions: USDT enables seamless transactions within the crypto ecosystem. It acts as a bridge between traditional fiat currencies and digital assets, allowing users to transfer value quickly and securely. With USDT, you can easily move funds between exchanges, participate in initial coin offerings (ICOs), or simply hold a stable digital asset in your portfolio.
Hedge Against Volatility: USDT provides a hedge against the volatility of other cryptocurrencies. By converting your crypto holdings into USDT during times of market uncertainty, you can effectively lock in the value of your assets and protect them from sudden price fluctuations. This feature makes USDT a valuable tool for risk management and portfolio diversification.
Enhanced Trading Opportunities: The stability of USDT opens up a plethora of trading opportunities. Many cryptocurrency exchanges offer USDT trading pairs, allowing you to exchange USDT for other cryptocurrencies seamlessly. This feature enables you to take advantage of market movements, participate in arbitrage, or execute trades quickly without needing to rely solely on fiat currencies.
As the cryptocurrency market continues to evolve, USDT remains a cornerstone stablecoin, providing stability and versatility to traders and investors alike. Adding USDT to your MetaMask wallet opens doors to a whole new realm of possibilities within the decentralized finance ecosystem.
![]()
What is MetaMask?
MetaMask has become a go-to tool for many cryptocurrency enthusiasts and blockchain users. This browser extension combines the functionality of a digital wallet with the power of a decentralized application (DApp) browser. Let’s take a closer look at MetaMask, its functions, and why it has gained immense popularity among crypto users:
Your Gateway to the Blockchains: MetaMask serves as your gateway to the blockchains, allowing you to seamlessly interact with decentralized applications. It provides a user-friendly interface that simplifies the process of managing your digital assets and engaging with the ecosystem.
Securely Store and Manage Your Digital Assets: One of MetaMask’s primary functions is to securely store and manage your cryptocurrencies. It acts as a digital wallet where you can safely store your Ethereum-based tokens, including USDT. MetaMask uses advanced encryption techniques to protect your private keys, ensuring that your assets remain secure.
Easy Access to Decentralized Applications (DApps): MetaMask is equipped with a built-in DApp browser, giving you direct access to a wide range of decentralized applications. These DApps enable various functionalities such as decentralized exchanges, lending platforms, decentralized games, and much more. With MetaMask, you can explore and interact with these applications seamlessly, all within the comfort of your web browser.
Simplified Transaction Process: MetaMask simplifies the process of sending and receiving cryptocurrencies. Instead of manually entering complex wallet addresses, MetaMask allows you to interact with DApps and initiate transactions with just a few clicks. It streamlines the transaction process, making it more user-friendly for both beginners and experienced users.
Enhanced Security and Privacy Features: MetaMask prioritizes the security and privacy of its users. It ensures that your private keys and personal information are stored locally on your device, preventing unauthorized access. Additionally, MetaMask gives you control over your data and allows you to manage permissions for individual DApps, giving you the freedom to choose what information you share.
Wide Compatibility and Community Support: MetaMask enjoys widespread compatibility with various blockchains and DApps. It has become the go-to wallet for many developers, making it highly supported within the crypto community. With a thriving community and continuous updates, MetaMask remains at the forefront of innovation in the decentralized finance space.
MetaMask has become an indispensable tool for navigating the decentralized world of blockchain and cryptocurrencies. Its user-friendly interface, advanced security features, and seamless integration with DApps have made it a favorite among crypto users worldwide.
![]()
Conclusion
Congratulations! You’ve now learned how to add USDT to your MetaMask wallet, opening up a world of possibilities for your cryptocurrency transactions. Let’s recap what we’ve covered and highlight the ease of the process:
Adding USDT to MetaMask has never been easier. By following the step-by-step guide provided in this article, you can seamlessly integrate this stablecoin into your wallet and take advantage of its benefits. Let’s summarize the key points:
Understanding USDT: We began by exploring what USDT is and its significance in the crypto world. As a stablecoin pegged to the US dollar, USDT offers stability and reliability, making it a valuable asset for traders and investors.
Introducing MetaMask: We then delved into the features and functions of MetaMask. This powerful browser extension serves as your gateway to the Ethereum blockchain, allowing you to securely store, manage, and interact with your digital assets and decentralized applications.
Step-by-Step Guide: The step-by-step guide provided detailed instructions on how to add USDT to your MetaMask wallet. From opening MetaMask to searching for USDT and confirming the addition, each step was carefully outlined to ensure a smooth process.
With USDT now successfully added to your MetaMask wallet, you can enjoy enhanced accessibility, simplified trading, and a myriad of investment opportunities within the decentralized finance ecosystem.
Keep Exploring:
As you venture into the world of USDT and MetaMask, there’s so much more to discover. Here are a few suggestions to further your knowledge and maximize your crypto experience:
- Explore Additional Tokens: Aside from USDT, there are numerous other tokens available on the Ethereum blockchain. Take the time to research and explore different cryptocurrencies that align with your investment goals and interests.
- Dive into DeFi: Decentralized finance (DeFi) has revolutionized the way we engage with financial services. Discover the exciting world of DeFi protocols, such as lending platforms, decentralized exchanges, and yield farming, and see how you can put your USDT and MetaMask to work.
- Stay Informed: The cryptocurrency landscape is constantly evolving. Stay updated with the latest news, trends, and developments in the crypto space. Follow reputable sources, join online communities, and engage in discussions to expand your knowledge and make informed decisions.
In conclusion, adding USDT to your MetaMask wallet empowers you to engage with the world of cryptocurrencies with ease and security. By leveraging the stability of USDT and the user-friendly features of MetaMask, you’re well-equipped to navigate the decentralized finance landscape and take advantage of the exciting opportunities it offers.
Now it’s your turn to put your newfound knowledge into action. Start by adding USDT to your MetaMask wallet and embark on your crypto journey today. Don’t forget to share this post with others who might benefit from it and continue exploring the fascinating world of USDT, MetaMask, and all things crypto. Happy exploring!
The End Words
At Adaas Capital, we hope that by reading this article you will be fully immersed in How To Add USDT To Metamask! You can help us improve by sharing this post which is published in Adaas Investment Magazine and help optimize it by submitting your comments.
FAQ
Does Metamask support the TRC20 Tron network?
No, Metamask Wallet only supports blockchains that use the POS consensus mechanism to approve their transactions such as Ethereum or Binance Smart Chain. Tron Blockchain currently uses POW and you cannot add this network to your wallet!
What is the USDT Token Smart Contract Address?
Here are the most popular blockchains that Metamask supports them:
Ethereum: Click Here >
Binance Smart Chain (BEP20): Click Here >
Arbitrum: Click Here >
Polygon: Click Here >
What wallet is best for TRON TRC20?
The most popular wallet for mobile users to manage TRON-based assets is Trust Wallet. For PC users, one of the best options is Atomic Wallet. You should know you have to do your own research to find the best wallet!
Is TRON TRC20 the same as Usdt TRC20?
No, TRON TRC20 and USDT TRC20 are not the same. TRON TRC20 is a standard for creating and implementing tokens on the TRON blockchain, while USDT TRC20 is a specific token that operates on the TRON network. USDT TRC20 is a version of Tether (USDT) that has been adapted to work on the TRON blockchain. Both TRON TRC20 and USDT TRC20 tokens exist within the TRON ecosystem, but they serve different purposes and have different functionalities.
I’ve shared this post with my colleagues, and they’re equally impressed