How To Add BUSD To Metamask Wallet?
Learn How to Safely Add Binance USD (BUSD) to Your MetaMask Wallet and Expand Your Crypto Portfolio
By reading the article “Importing BUSD to MetaMask Guide” published in Adaas Investment Magazine, you will be fully familiar with the easiest methods to add and manage the Binance USD Token known as BUSD to your Metamask wallet! This level of familiarity can be enough when you need educational information about this topic.
In the fast-paced world of cryptocurrencies, having a secure and user-friendly wallet is essential for managing your digital assets. MetaMask has emerged as one of the most popular crypto wallets, offering a seamless way to interact with decentralized applications (DApps) and securely store your cryptocurrencies. One such cryptocurrency gaining significant traction is BUSD (Binance USD), a stablecoin pegged to the value of the US dollar.
MetaMask: Your Gateway to the Crypto Universe
If you’re new to the world of cryptocurrencies, you may be wondering what MetaMask is all about. Well, think of it as your passport to the crypto universe. MetaMask is a browser extension that acts as a bridge between your web browser and blockchains, allowing you to seamlessly interact with DApps and manage your digital assets.
BUSD: Stability in a Volatile Crypto Market
While cryptocurrencies are known for their volatility, stablecoins like BUSD provide stability and act as a reliable medium of exchange. Here’s why adding BUSD to your MetaMask wallet can be advantageous:
Fast and Low-Cost Transactions: Powered by the Ethereum blockchain, BUSD enables fast and low-cost transactions. Whether you’re sending BUSD to a friend or using it to participate in DeFi protocols, you can enjoy the benefits of near-instantaneous transactions and minimal fees.
Wider Accessibility: As BUSD is an ERC-20 token, it can be easily integrated into various Ethereum-based platforms and DApps. By adding BUSD to your MetaMask wallet, you gain access to a broader range of decentralized finance (DeFi) applications, lending platforms, and decentralized exchanges, expanding your opportunities within the crypto ecosystem.
By adding BUSD to your MetaMask wallet, you unlock a world of possibilities, combining the convenience of a user-friendly wallet with the stability of a widely accepted stablecoin. In the following sections, we will guide you through the step-by-step process of adding BUSD to your MetaMask wallet, ensuring you can tap into the potential of this digital asset with ease and confidence.
Table of Contents
Step-by-step Guide on Adding BUSD to MetaMask
In this guide, we have provided you with two methods to import the Binance USD token to your Metamask wallet. The first method is the easiest and safest way to do this process and we suggest it to beginners to prevent any mistakes in the process of adding tokens to the Metamask wallet.
1- The Simplest Way For Beginners:
If you’re looking to effortlessly add a token to your MetaMask wallet, we’ve got you covered. Follow these straightforward steps to import any compatible token into your MetaMask wallet with ease:
Step 1: Install and Activate MetaMask Wallet
Start by installing the MetaMask wallet extension in your browser. Once installed, activate the wallet by following the setup instructions provided. Creating a new wallet or importing an existing one is a breeze with MetaMask.
Don’t Worry! In the following sections, we have placed a comprehensive step-by-step guide to installing the Metamask Wallet extension for your browser.
Step 2: Add the Host Network
To ensure seamless compatibility, you need to add the appropriate network to your MetaMask wallet. For example, if you’re adding a BEP20-based token, such as BUSD, you’ll need to add the Binance Smart Chain network to MetaMask. This network addition is essential for successful token integration.
We’ve Got You! If you do not know how to add a new network to your Metamask wallet, we have published a comprehensive guide to adding the Binance Smart Chain network to Metamask for a practical example.
Step 3: Search for Your Desired Token
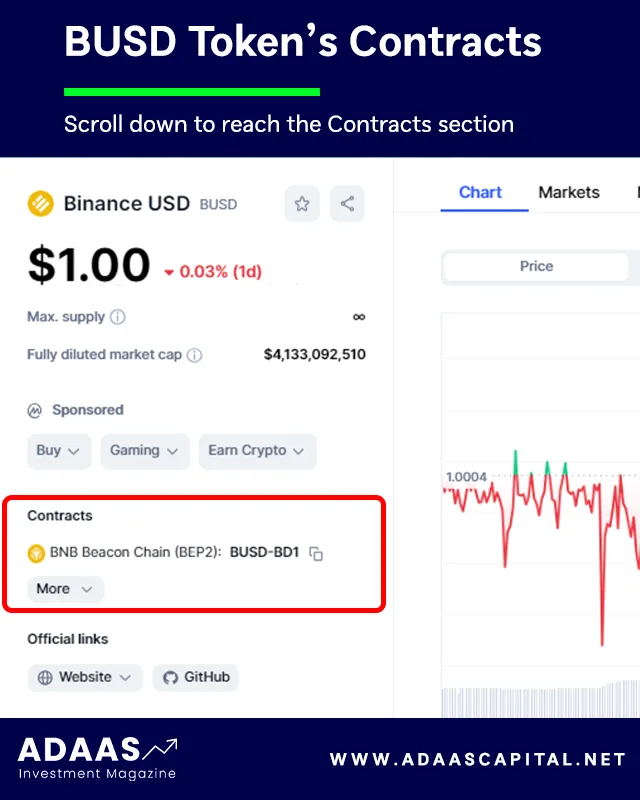
Head over to coinmarketcap.com, the popular cryptocurrency information platform, and search for the token you want to add. In this guide, we’ll use BUSD as our example.
Step 4: Access the Token’s Contract Details
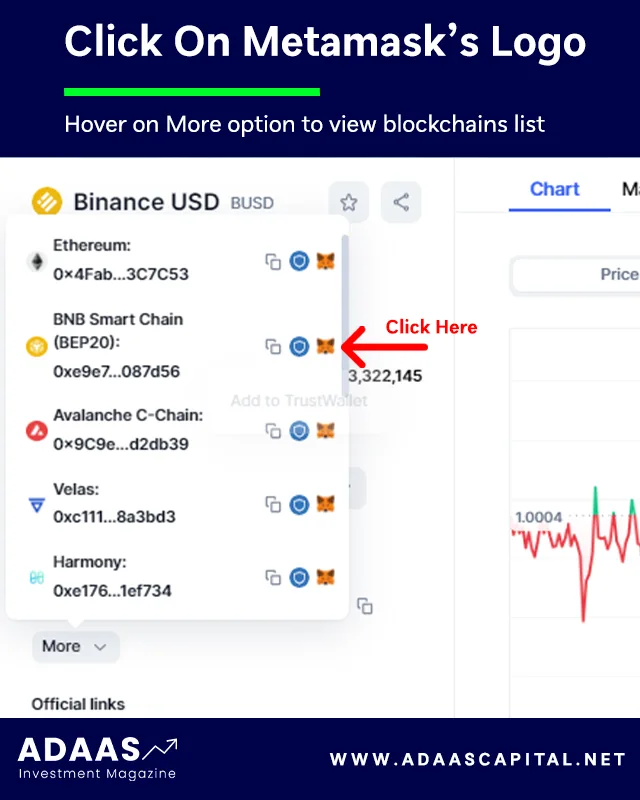
Once you’re on the BUSD page, scroll down on the left side until you reach the “Contracts” section. Hover over the “More” option, and a list of blockchains supporting the token will appear. Here’s where the magic happens!
Step 5: Click on the MetaMask Logo
In front of each blockchain listed, you’ll see three options. Look for the one that features the MetaMask logo and click on it. This action will initiate the token import process to your MetaMask wallet.
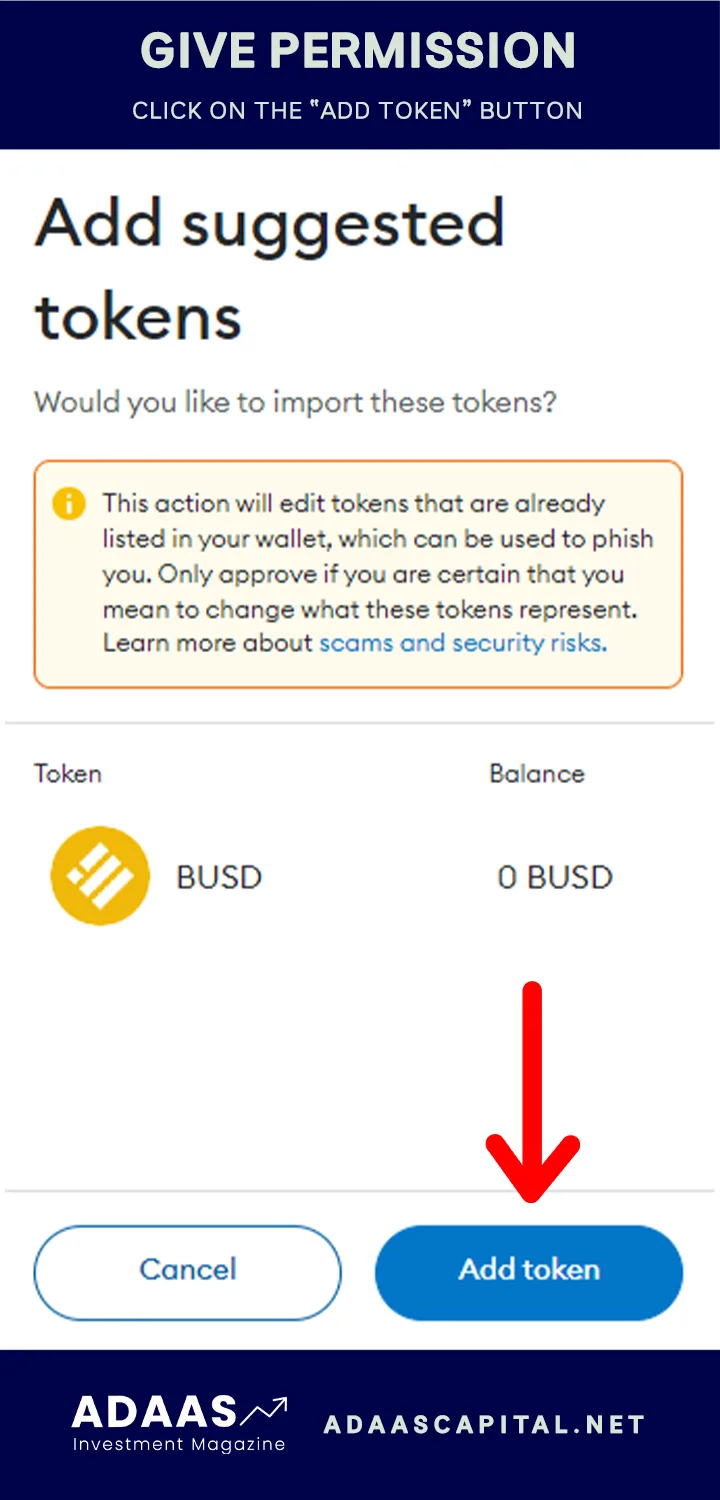
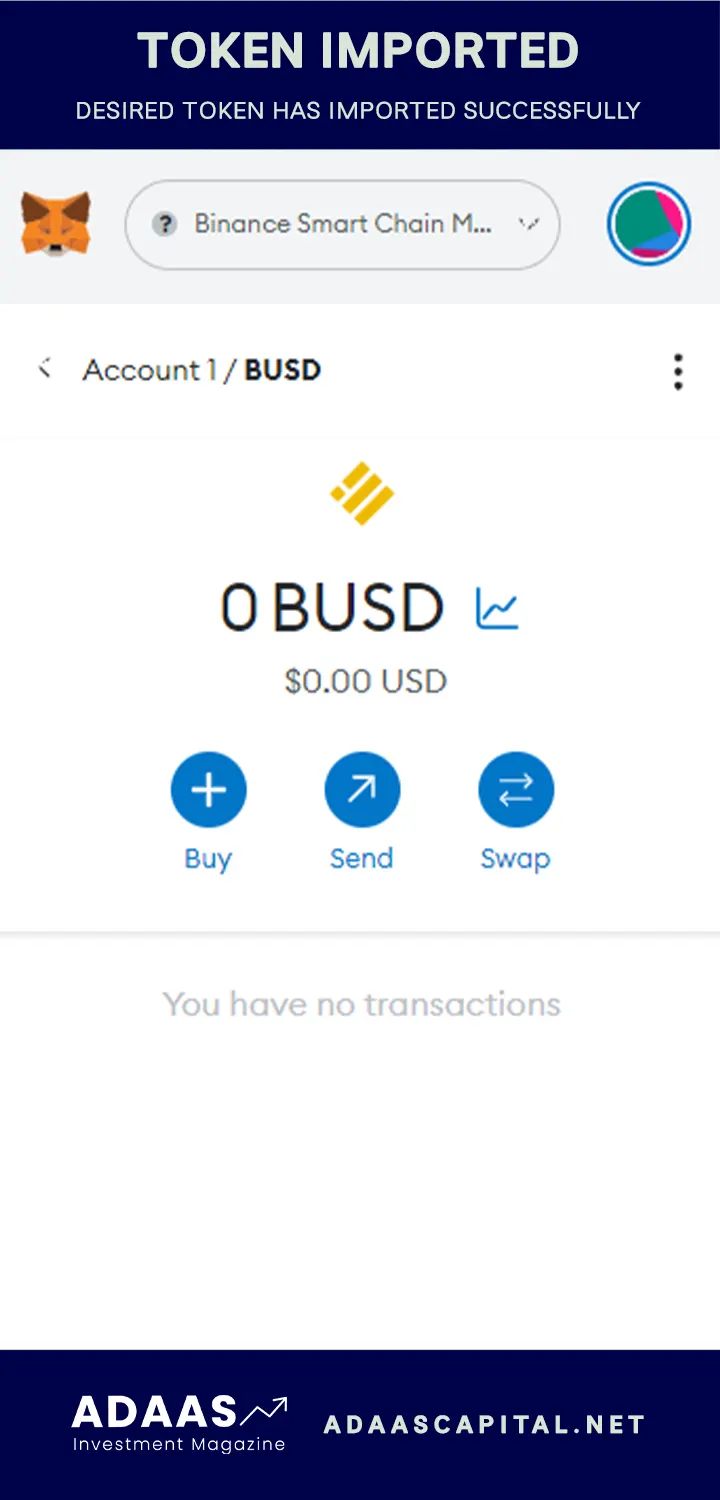
Step 6: Confirm the Token Addition
MetaMask will display an alert, confirming your intention to add the token to your wallet. To finalize the process, simply click on the “Add Token” button, and voila!
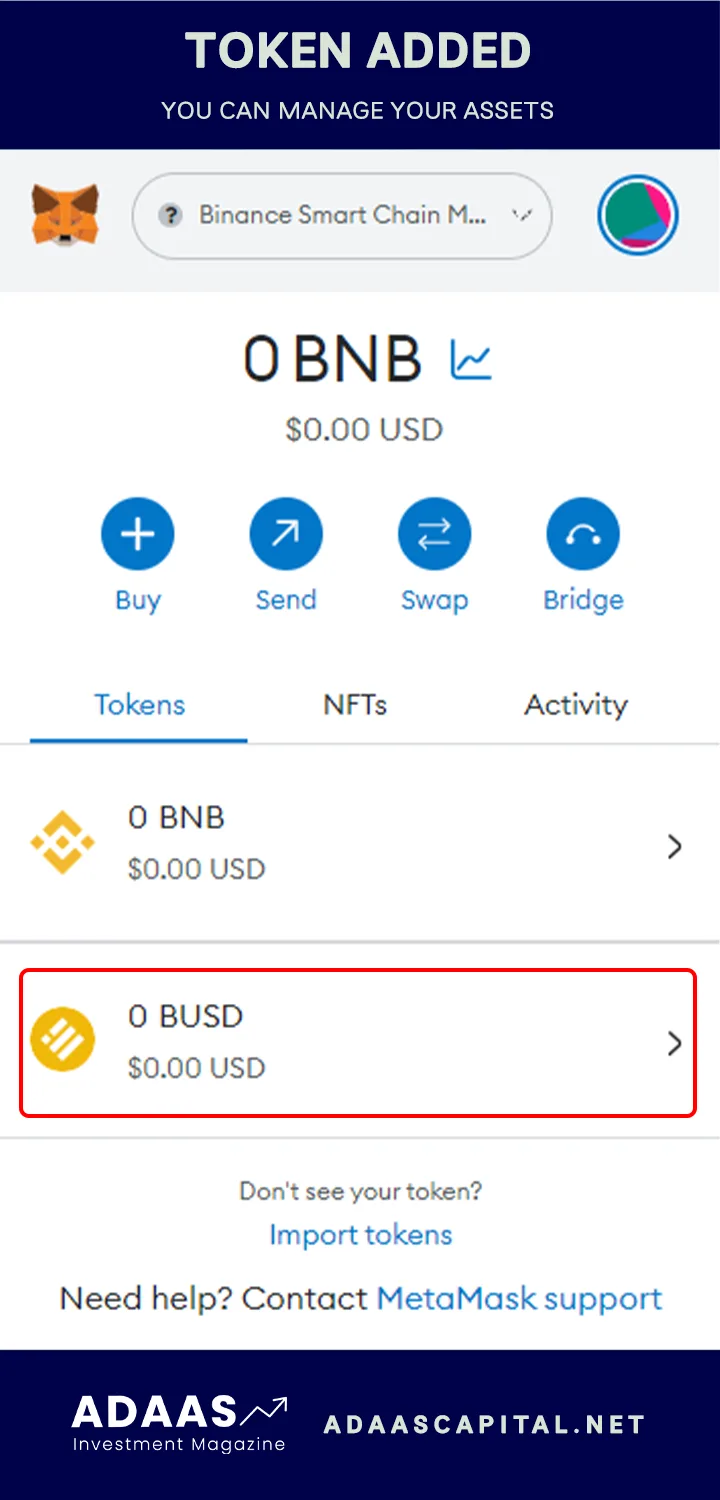
Congratulations! You have successfully added the BUSD token to your MetaMask wallet. You can now manage and track your BUSD holdings alongside your other digital assets. Enjoy the convenience and flexibility that MetaMask provides for your crypto journey.
Remember, this process can be applied to other compatible tokens as well. So feel free to explore and diversify your wallet with different tokens using the same hassle-free method.
2- A method for experts:
Adding BUSD (Binance USD) to your MetaMask wallet is a straightforward process that allows you to manage this stablecoin alongside your other digital assets. Follow these simple steps to seamlessly integrate BUSD into your MetaMask wallet:
Step 1: Install and Set Up MetaMask
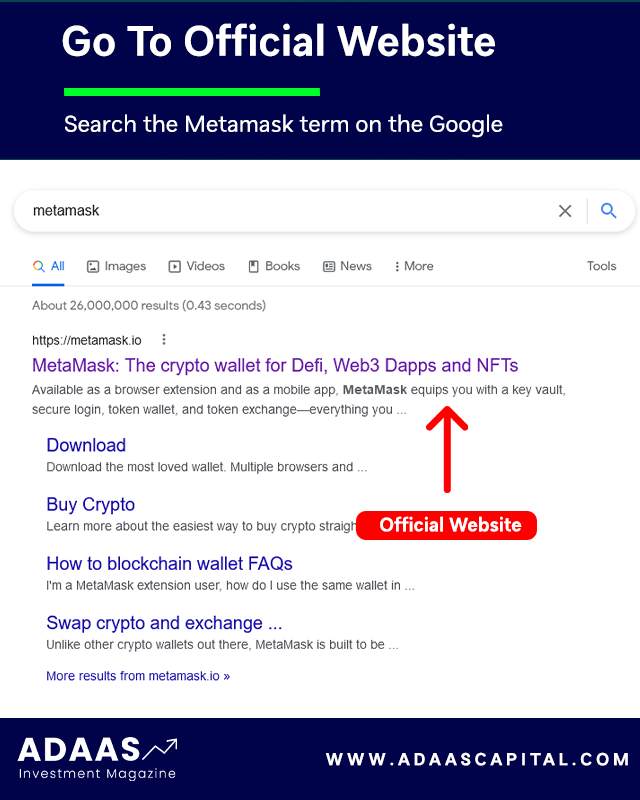
If you haven’t already, start by installing the MetaMask browser extension or mobile app. Visit the official MetaMask website and follow the instructions for your preferred browser or mobile platform. Create a new wallet or import an existing one by securely entering your seed phrase.
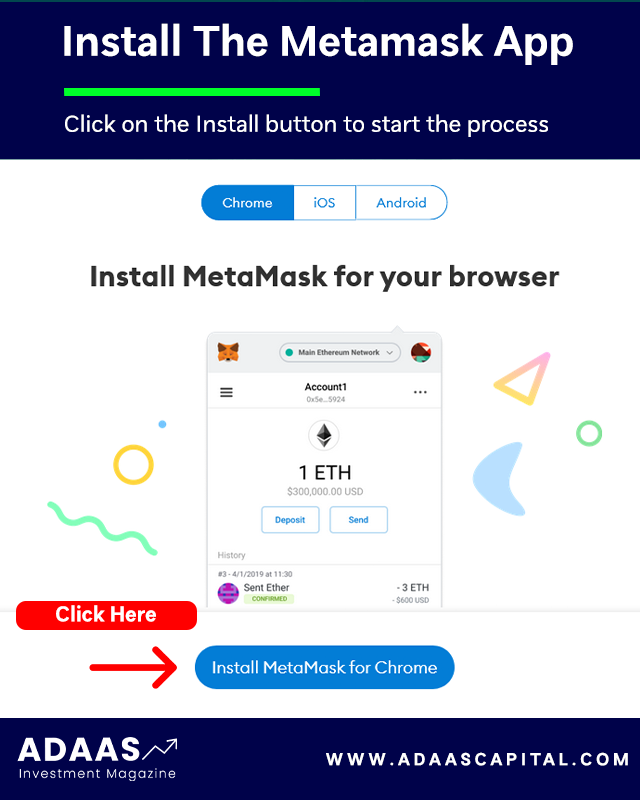
To install the Metamask wallet for desktop or mobile devices, the best way is to visit the official website at www.metamask.io and You can also Google the name of this wallet and finally enter the Metamask wallet official website. On the main page of this website, the Download Now button will take you to a page from which you can download the software version suitable for your mobile or computer.
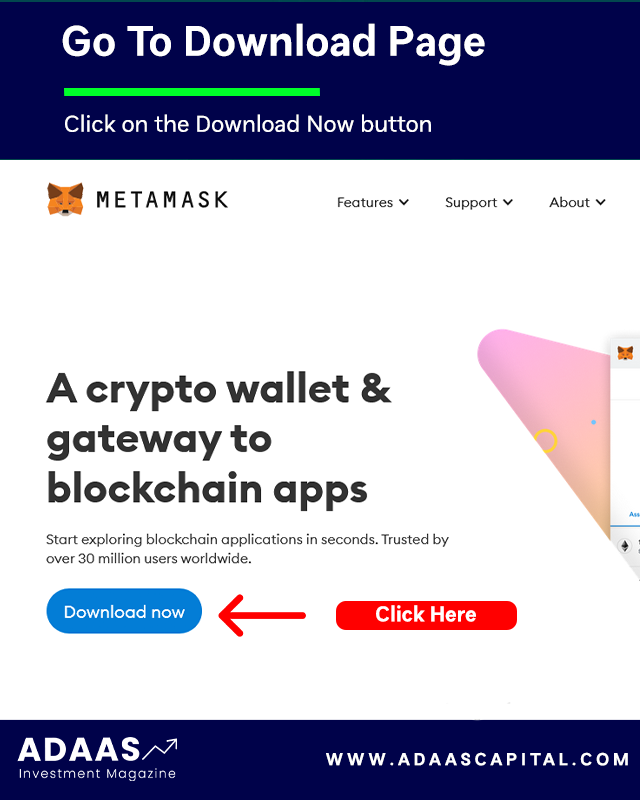
On the Download page, your device’s operating system will be automatically detected and the download option will be displayed. Of course, if needed, you can also download and use the versions of other operating systems.
Metamask Wallet is developed and can be installed for Android, iOS and Chrome, Firefox, Brave, and Edge browsers.
For example, in this tutorial, we will install this wallet for the Chrome browser. After clicking on the “Install MetaMask for Chrome” option, we will be redirected to the official installation page of this extension.
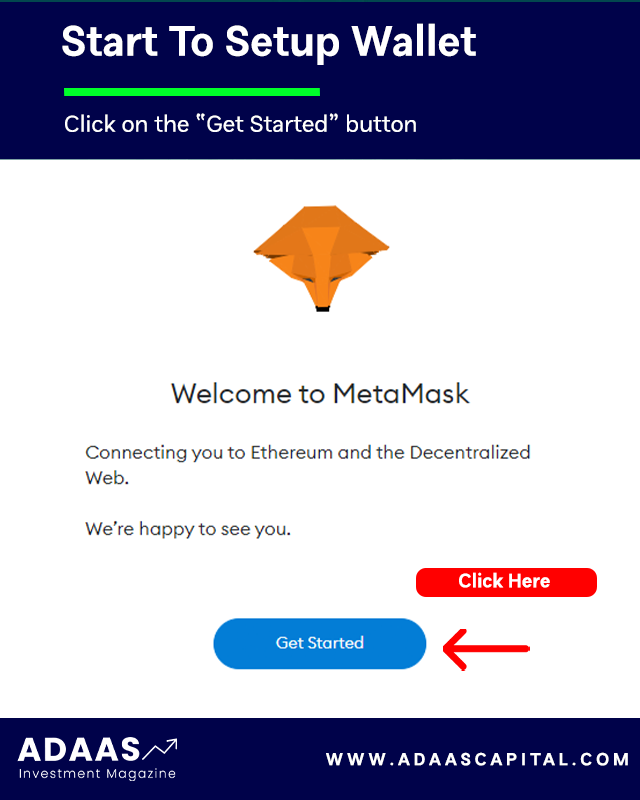
Then on this page, we click on the “Add to Chrome” button and it asks us for permission to install it, and to do this, we click on the Add Extension button, and finally, the message that the MetaMask extension is successfully installed will be displayed to us.

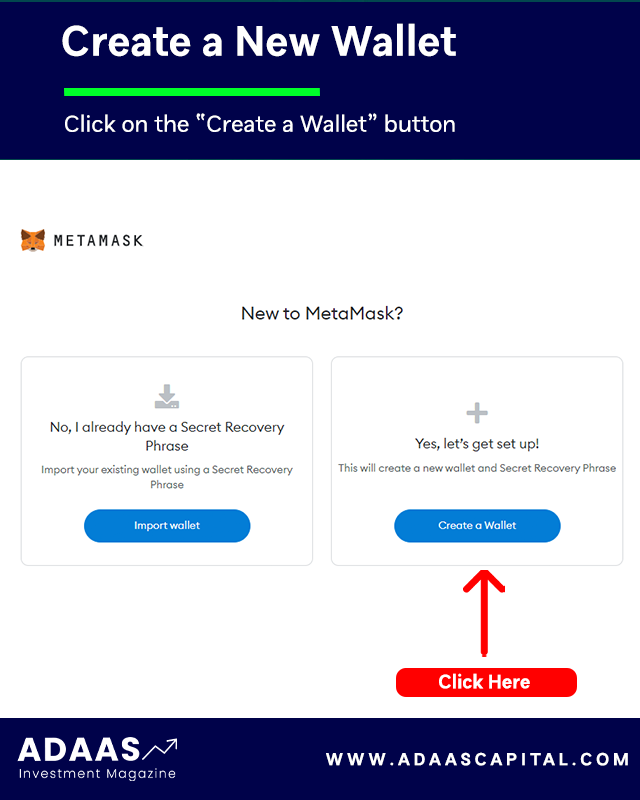
By clicking on the Metamask logo in the Chrome browser extensions section, we will enter a page that starts the setup process by clicking on the “Get Started” button. On the new page, you will be asked to select:
- Left option: Import an existing wallet by its recovery phrase.
- Right option: Create a new wallet for you.
In this tutorial, we want to create a new wallet for ourselves, so we select the right option, Create a Wallet.
The new page asks you for access to grab information such as pages visited in the software by users (Page Views) to collect and analyze them, and to apply optimizations to improve the user experience. Also, you can select the “No Thanks” option if you do not want to allow it.
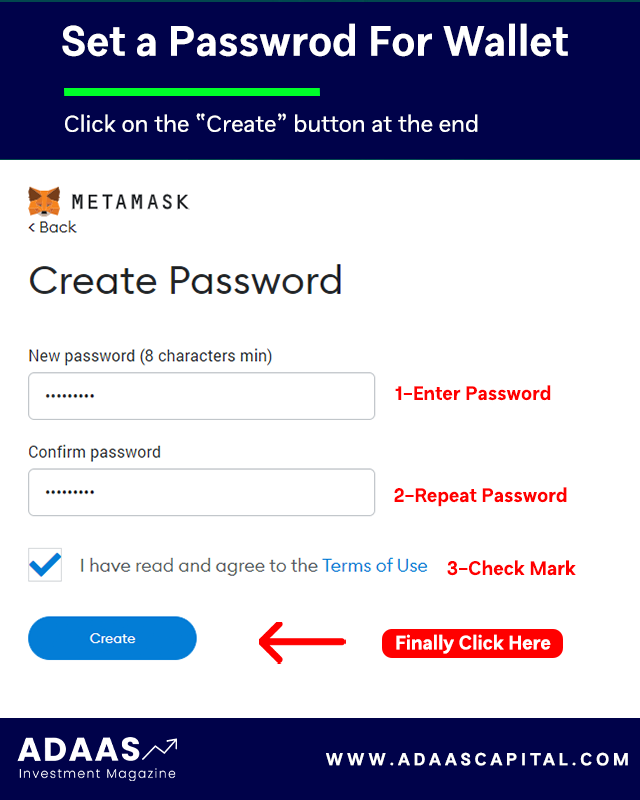
Next, you need to enter a strong password to log in to the Metamask wallet and re-enter it in the second field to confirm it, and finally check the Term of use option and at the end click the Create button.

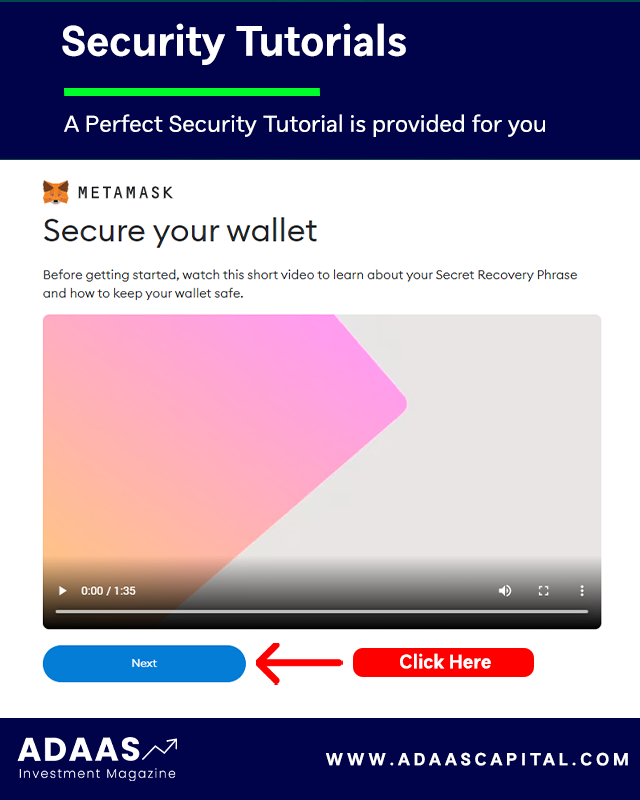
A tutorial has been prepared for you to provide more security for the Metamask wallet, which you can view if you wish so that you can learn valuable tips for free therefore you can keep your wallet safe and secure from possible attacks by hackers or thieves.
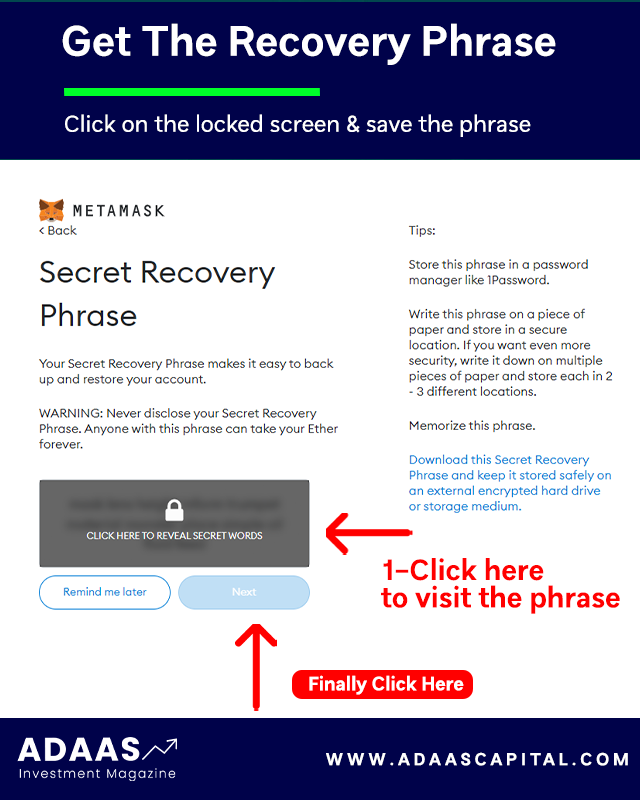
After viewing the tutorial, you will enter a very important page that displays the wallet recovery phrase for you. Keep these recovery words in a safe place so you can use them to recover your wallet if needed.
Note that access to wallet recovery phrase is equivalent to access to all digital assets stored in that wallet, so it is best to be diligent in keeping it secure!
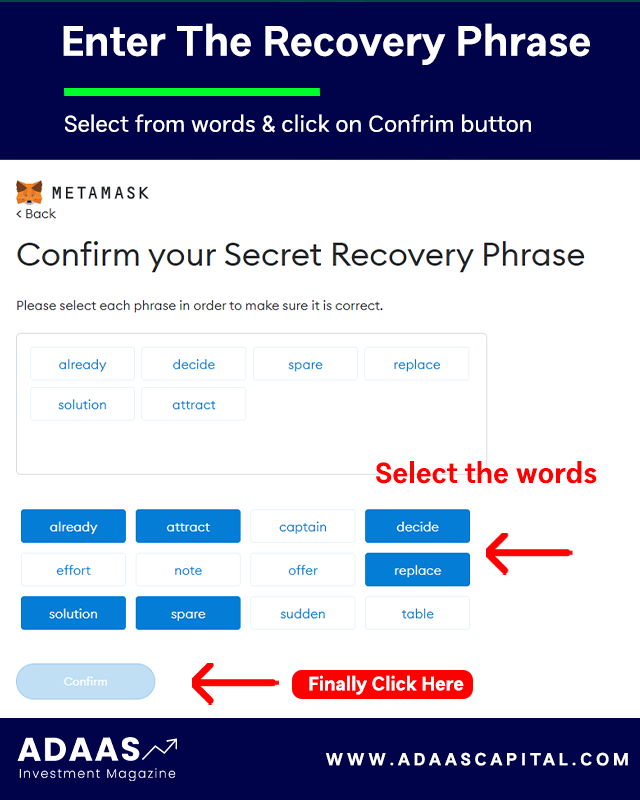
After noting the recovery phrase, click the Next button to be redirected to the page where you want to enter them. On this page, you have to enter the 12 recovery words that you wrote down in the previous step and finally click the Confirm button.
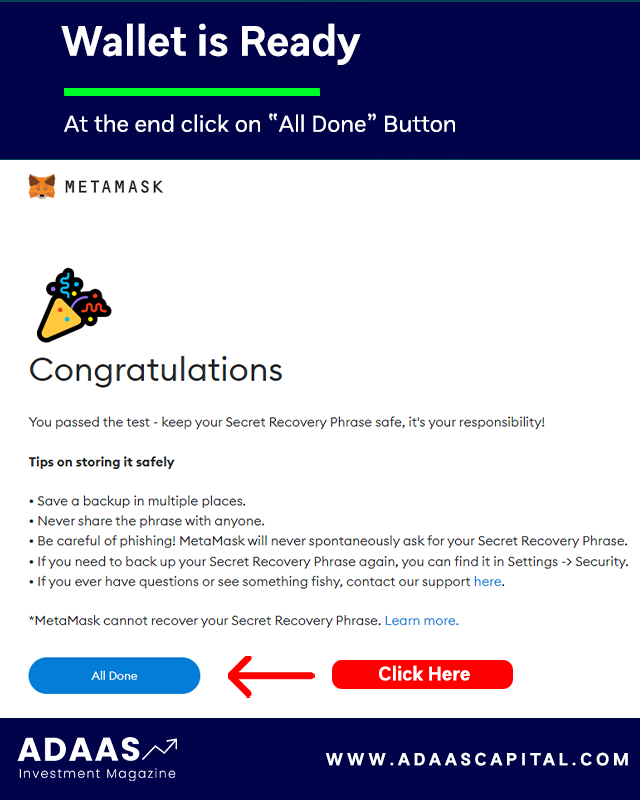
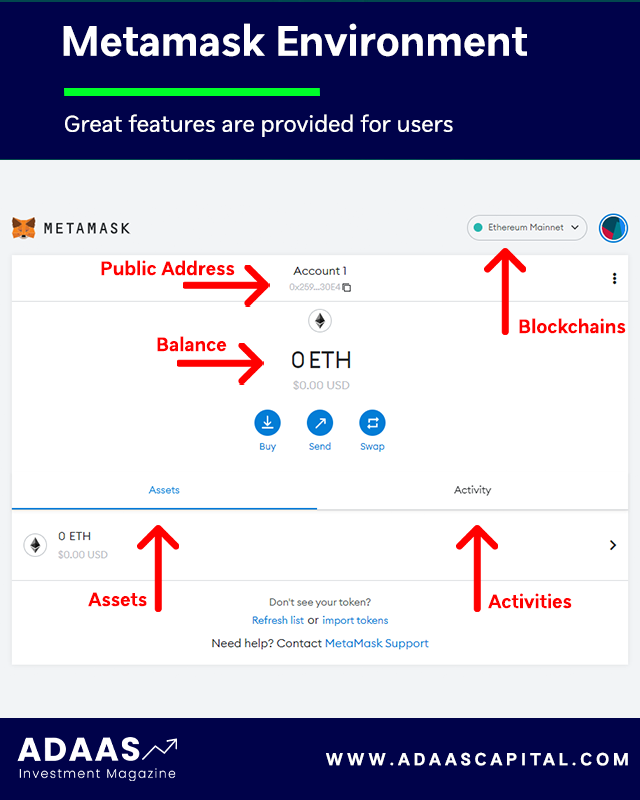
If you have done all the steps correctly, you will be presented with a congratulations page, which means your wallet is made by Metamask software. After clicking on the All Done button, you will be directed to the Metamask wallet software environment.
This page displays information such as the type of blockchain, the amount of assets stored, past activities, the public address of the wallet, the button to add tokens, and other features.
Note that the steps we went through are the same for installing and launching Metamask wallet on other operating systems such as Android or iOS, and you can use this tutorial to install Metamask wallet on mobile as well.
Step 2: Navigate to the Tokens Tab
Once MetaMask is set up, open the extension or app and navigate to the main dashboard. Look for the “Tokens” tab, usually located at the bottom of the screen. Click or tap on the “Tokens” tab to proceed.
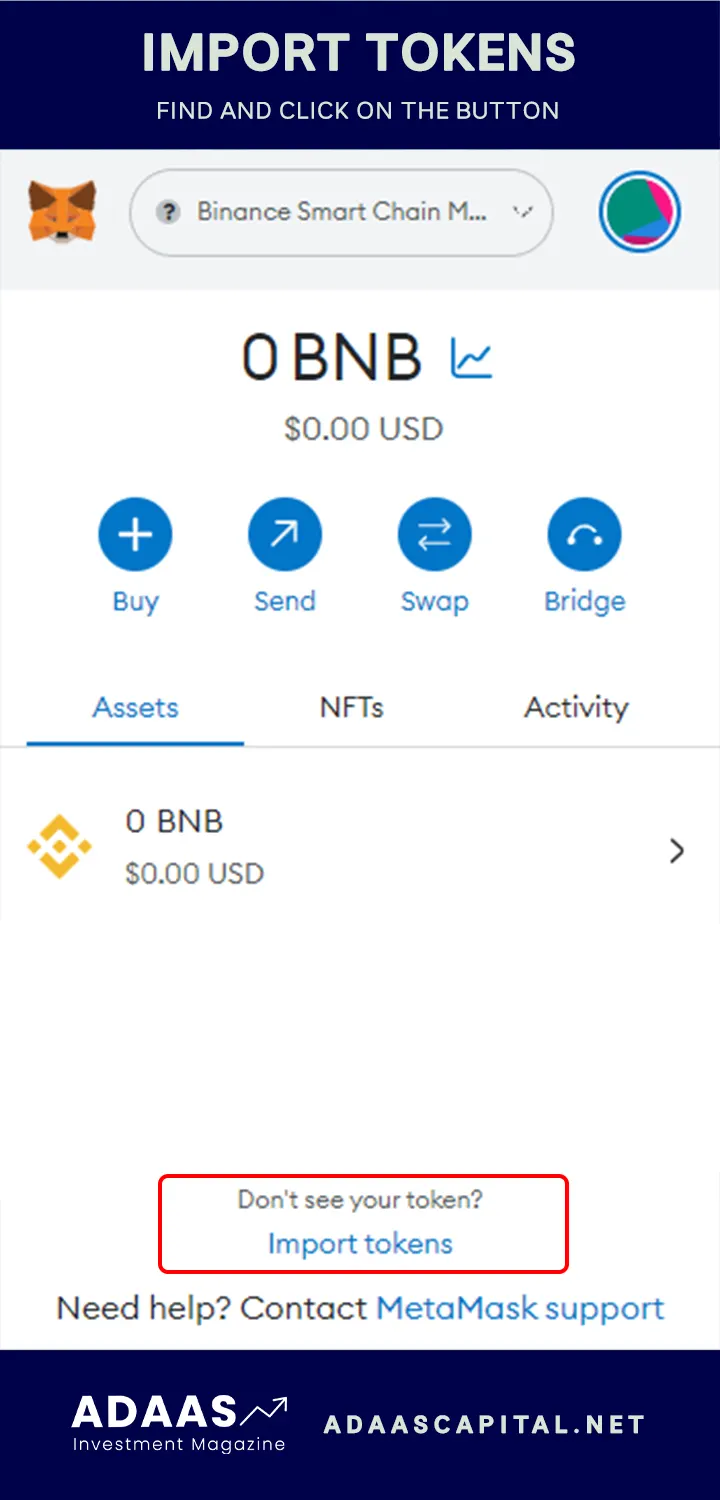
Step 3: Add a Custom Token
In the Tokens tab, you’ll see a list of tokens that are already supported by MetaMask. To add BUSD, we need to input its contract details. Locate and click on the “Add Token” or “Custom Token” button. This will open a form where you can enter the contract details.
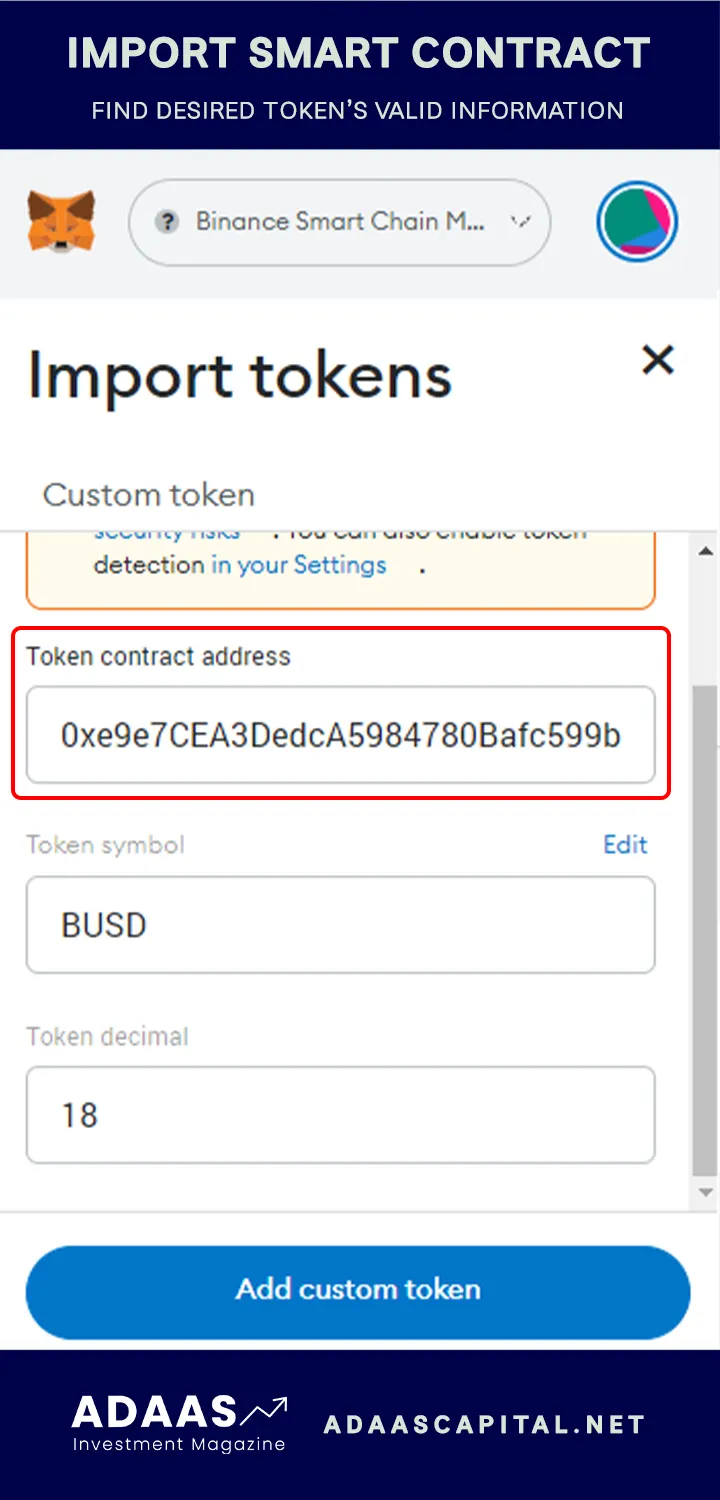
Step 4: Input BUSD Contract Address
To add BUSD as a custom token, you’ll need to input its contract address. For example, the contract address for BUSD on the BSC blockchain is [Click Here]. Copy and paste this address into the relevant field in the form. MetaMask should automatically fill in the token symbol (BUSD) and decimal places (18).
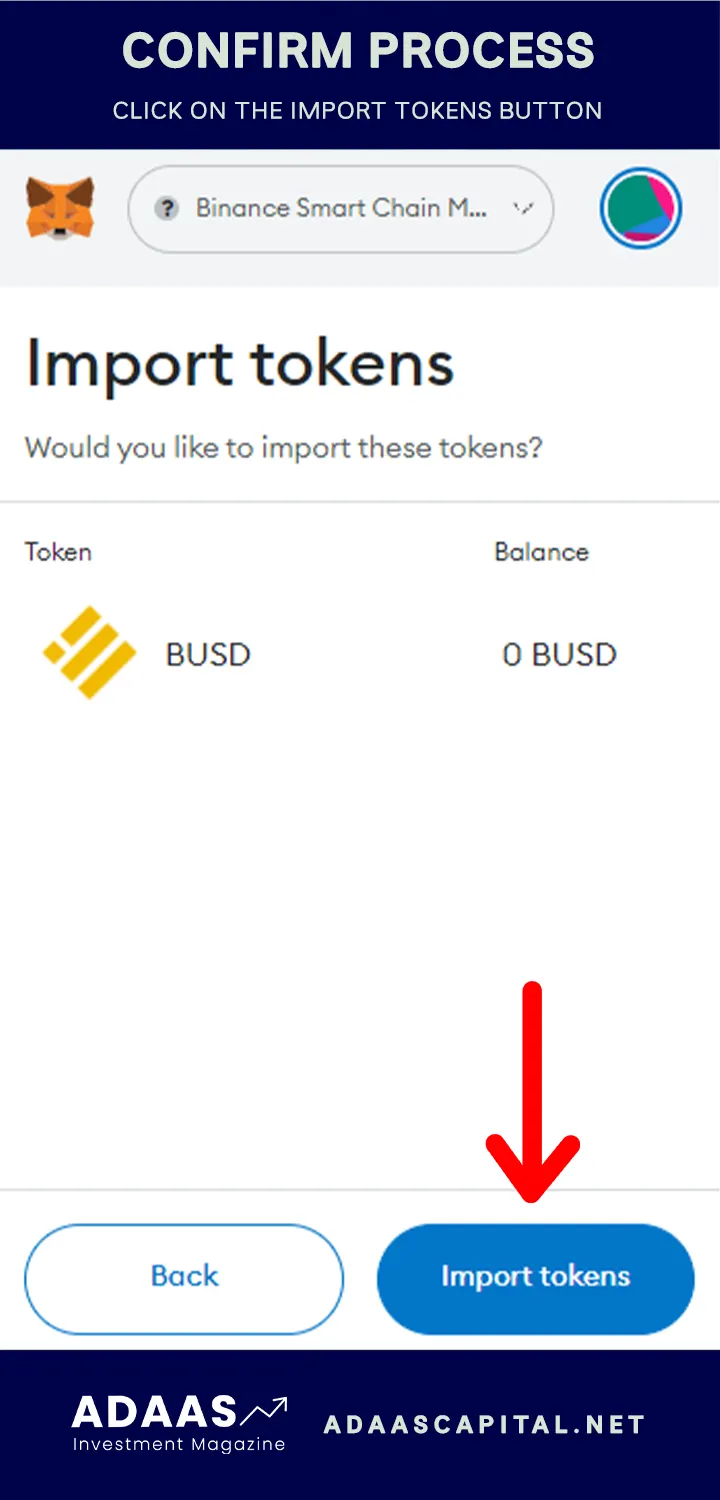
Step 5: Confirm and Complete the Process
After inputting the BUSD contract address, double-check that all the details are accurate. Click or tap on the “Next” or “Add” button to confirm and complete the process. MetaMask will ask for your confirmation to add the BUSD token to your wallet. Approve the request, and within a few moments, BUSD will be successfully added to your MetaMask wallet.
Congratulations! You have now added BUSD to your MetaMask wallet, allowing you to view and manage your BUSD holdings alongside your other cryptocurrencies. You can check your wallet balance, send BUSD to other addresses, or utilize BUSD in decentralized finance (DeFi) platforms, all within the secure and user-friendly MetaMask environment.
Remember to always verify the accuracy of the contract address and details when adding custom tokens to your MetaMask wallet. In case of any updates or changes to the contract, refer to official sources or the BUSD issuer’s website for the most up-to-date information.
Common Issues and Solutions
While adding BUSD to MetaMask is generally a smooth process, some users may come across a few common issues along the way. Here, we’ll discuss these issues and provide practical solutions to help you troubleshoot and successfully add BUSD to your MetaMask wallet:
Token Not Showing in MetaMask:
Issue: After adding BUSD as a custom token, you may not see it displayed in your MetaMask wallet. Solution: Try the following steps to resolve the issue:
– Refresh the MetaMask wallet page or close and reopen the MetaMask app to ensure it is synced properly.
– Double-check that you entered the correct contract address for BUSD during the token addition process.
– Manually add the token by clicking on “Add Token” or “Custom Token” again, and re-enter the BUSD contract details.
Incorrect Token Symbol or Decimals:
Issue: The token symbol or decimal places for BUSD may not appear correctly in MetaMask. Solution: To address this problem, follow these steps:
– Open the Tokens tab in MetaMask and find the BUSD token.
– Click on the three-dot menu next to the token and select “Edit.”
– Manually correct the token symbol and decimal places if they are incorrect.
– Save the changes and refresh your MetaMask wallet to ensure the updated information is displayed accurately.
Invalid BUSD Contract Address:
Issue: If you accidentally input an incorrect BUSD contract address, the token won’t be added to your MetaMask wallet. Solution: To rectify this issue, take the following actions:
– Double-check the contract address you entered for BUSD and compare it with the correct BUSD contract address.
– If you find an error, repeat the token addition process, ensuring you input the correct BUSD contract address.
– Always verify the contract address from reliable sources, such as the official Binance or BUSD issuer’s website.
Network Compatibility Issues:
Issue: BUSD may be available on different networks (e.g., Ethereum, Binance Smart Chain), but you may have selected an incompatible network in MetaMask. Solution: Consider the following steps to resolve network compatibility issues:
– Ensure you have selected the correct network in MetaMask that corresponds to the BUSD token you want to add.
– If BUSD operates on Binance Smart Chain, switch your MetaMask network to the Binance Smart Chain network.
– If BUSD operates on a different network, make sure you select the appropriate network to add the token successfully.
By addressing these common issues and following the provided solutions, you should be able to add BUSD to your MetaMask wallet without any significant hurdles. Remember, it’s essential to exercise caution, verify information, and stay up-to-date with the latest changes or updates related to BUSD or MetaMask.
In case you encounter any other specific issues or face difficulties not mentioned here, it is recommended to consult official documentation, community forums, or reach out to MetaMask support for further assistance.
What is MetaMask?
In the world of cryptocurrencies, MetaMask has established itself as a go-to crypto wallet for millions of users. If you’re new to MetaMask or curious about its features, let’s dive into a quick overview of this powerful tool and uncover the benefits it offers:
Your Gateway to Decentralized Applications (DApps): MetaMask acts as a bridge between your web browser and the Ethereum blockchain, enabling you to seamlessly interact with decentralized applications (DApps). With MetaMask, you can access a plethora of DApps, ranging from decentralized exchanges and lending platforms to NFT marketplaces and gaming applications.
Secure and User-Friendly: MetaMask prioritizes the security of your digital assets. When you create a wallet, MetaMask generates a unique 12-word seed phrase, which serves as your master key. This seed phrase is crucial for accessing your wallet from different devices or recovering your wallet if necessary. Remember to store this phrase securely offline.
Multi-Platform Support: MetaMask is compatible with various web browsers, including Google Chrome, Firefox, and Brave. Whether you prefer to browse the internet on your desktop or mobile device, MetaMask has got you covered. You can easily install the MetaMask extension or app on your preferred platform and access your wallet seamlessly.
Smart Contract Interaction: MetaMask allows you to interact directly with smart contracts on the Ethereum blockchain. This means you can participate in token sales (ICO/IEO), join decentralized finance (DeFi) platforms, or even create your own smart contracts. MetaMask’s intuitive interface makes it convenient to interact with these features without the need for extensive technical knowledge.
Enhanced Privacy Control: In the world of cryptocurrencies, privacy is a top concern. MetaMask offers you the ability to manage your digital identity and control the information you share with DApps. You can choose which websites or DApps can access your wallet, giving you greater control over your privacy and security.
Seamless Token Management: With MetaMask, you can effortlessly manage your digital assets, including cryptocurrencies and ERC-20 tokens. The wallet provides a clear overview of your portfolio, allowing you to view your balances, transaction history, and token holdings in one place. You can also add custom tokens to your MetaMask wallet, expanding your asset management capabilities.
MetaMask empowers users to explore the vast world of decentralized applications and manage their digital assets securely. Now that we have a better understanding of MetaMask, let’s dive into the step-by-step process of adding BUSD (Binance USD) to your MetaMask wallet, combining the power of this popular crypto wallet with the stability of a widely accepted stablecoin.
![]()
What is BUSD?
BUSD, short for Binance USD, is a stablecoin that has gained significant popularity in the world of cryptocurrencies. As its name suggests, BUSD is designed to maintain a stable value, specifically pegged to the US dollar. Let’s explore further to understand the purpose and advantages of BUSD:
Stability in a Volatile Crypto Market
One of the primary purposes of BUSD is to provide stability in the highly volatile cryptocurrency market. While many cryptocurrencies experience wild price swings, BUSD aims to offer a reliable digital asset with a value that remains consistently tied to the US dollar. This stability makes BUSD an attractive option for those who want to navigate the crypto space with a more predictable and less volatile currency.
Advantages of BUSD
– Seamless Transactions: BUSD operates on blockchain technology, specifically the Ethereum blockchain as an ERC-20 token. This enables users to conduct fast and secure transactions, similar to other cryptocurrencies. Whether you’re sending BUSD to friends or using it for online purchases, the seamless and efficient nature of BUSD transactions enhances the overall user experience.
– Global Accessibility: BUSD opens up a world of possibilities by eliminating the limitations of traditional banking systems. It can be accessed and utilized by anyone with an internet connection, regardless of their geographical location. This global accessibility paves the way for frictionless cross-border transactions and greater financial inclusion.
– Lower Volatility Risks: Cryptocurrencies are known for their price volatility, which can be both exciting and risky. However, with BUSD, users can enjoy the benefits of participating in the crypto space without being exposed to extreme price fluctuations. BUSD provides a more stable digital asset option, reducing the risks associated with traditional cryptocurrencies.
– Integration with DeFi Ecosystem: BUSD plays a vital role in the decentralized finance (DeFi) ecosystem. As an ERC-20 token, BUSD can be easily integrated into various DeFi platforms, including lending protocols, decentralized exchanges, and yield farming platforms. This allows users to earn interest, provide liquidity, or engage in other DeFi activities using BUSD as a stable and reliable digital asset.
Overall, BUSD offers stability, accessibility, and integration within the ever-expanding world of cryptocurrencies. It provides a gateway for individuals and businesses to navigate the crypto market without the inherent volatility associated with other digital assets. Now that we understand the purpose and advantages of BUSD, let’s move on to the step-by-step guide on how to add BUSD to your MetaMask wallet, enabling you to harness the power of this stablecoin within the secure and user-friendly MetaMask environment.
![]()
Conclusion
Adding BUSD to your MetaMask wallet opens up a world of possibilities within the realm of cryptocurrencies. Let’s recap the process and emphasize its importance before encouraging you to explore further:
By following the step-by-step guide outlined in this article, you’ve successfully added BUSD to your MetaMask wallet. This means you now have the ability to manage this stablecoin alongside your other digital assets, enjoying the benefits of stability, accessibility, and integration within the crypto ecosystem.
Recap of the Process:
1- Install and Set Up MetaMask: Begin by installing the MetaMask browser extension or mobile app, and create or import your wallet.
2- Navigate to the Tokens Tab: Access the Tokens tab within MetaMask to manage your token holdings.
3- Add a Custom Token: Click or tap on the “Add Token” or “Custom Token” button to add BUSD as a custom token.
4- Input BUSD Contract Address: Enter the correct BUSD contract address (Click Here) to ensure the token is recognized in your MetaMask wallet.
5- Confirm and Complete the Process: Double-check the details, click or tap “Next” or “Add,” and approve the addition of BUSD to your wallet.
The importance of adding BUSD to your MetaMask wallet lies in the stability and convenience it brings to your cryptocurrency endeavors. As a stablecoin pegged to the US dollar, BUSD offers a reliable digital asset that reduces the risks associated with price volatility. Moreover, BUSD’s integration with the Ethereum blockchain and compatibility with various DeFi platforms make it a versatile tool for transactions and participation in decentralized finance.
Encouragement to Explore:
Now that you have successfully added BUSD to MetaMask, we encourage you to delve deeper into the world of MetaMask and BUSD. Here are some avenues to explore:
– MetaMask Features: Familiarize yourself with the full range of features and functionalities offered by MetaMask. Explore advanced settings, security measures, and additional tokens or dapps you can integrate into your MetaMask wallet.
– DeFi Opportunities: Leverage BUSD’s stability within the decentralized finance ecosystem. Discover lending platforms, decentralized exchanges, and yield farming opportunities that accept BUSD. Participate in earning interest, providing liquidity, or engaging in other DeFi activities.
– Further Research: Dive into more resources and educational materials about MetaMask and BUSD. Stay informed about the latest updates, news, and developments in the world of cryptocurrencies to maximize your understanding and make informed decisions.
Remember, while MetaMask provides a secure and user-friendly environment for managing your digital assets, it’s essential to exercise caution and conduct thorough research. Stay vigilant, be mindful of security best practices, and always verify information from reliable sources.
By expanding your knowledge of MetaMask and exploring the potential of BUSD, you position yourself for a more seamless and rewarding crypto experience. Embrace the opportunities, stay curious, and continue your journey into the exciting world of cryptocurrencies.
The End Words
At Adaas Capital, we hope that by reading this article you will be fully immersed in How To Add BUSD To Metamask! You can help us improve by sharing this post which is published in Adaas Investment Magazine and help optimize it by submitting your comments.
FAQ
What is the BUSD token address?
The BUSD token address in popular blockchains is:
Binance Smart chain (BEP20): Click Here >
Ethereum: Click Here >
Avalanche C-Chain: Click Here >
What does mean Pegged BUSD?
Pegged BUSD refers to a cryptocurrency called Binance USD (BUSD) that is pegged or fixed to the value of a specific asset, typically the US dollar. This means that the value of BUSD is designed to stay relatively stable and maintain a 1:1 ratio with the US dollar. The purpose of pegging BUSD is to provide users with a stable and reliable digital currency that can be used for various transactions and investment purposes without the volatility often associated with other cryptocurrencies.
How do I create a BUSD address?
To create a BUSD address, you would need to have a compatible wallet that supports BUSD, such as MetaMask or Trust Wallet. Once you have set up your wallet, it will automatically generate a unique address for you. This address can be used to receive, store, and send BUSD tokens. Make sure to follow the instructions provided by your chosen wallet to create and secure your BUSD address properly.
Is BUSD the same as BNB?
No, BUSD (Binance USD) and BNB (Binance Coin) are not the same. BUSD is a stablecoin pegged to the value of the US dollar and issued on the Binance Smart Chain (BSC). It is designed to provide stability and facilitate transactions within the Binance ecosystem. On the other hand, BNB is the native cryptocurrency of the Binance platform and is used for various purposes such as paying for transaction fees, participating in token sales, and accessing certain features on the Binance exchange. While both BUSD and BNB are part of the Binance ecosystem, they serve different functions and have distinct characteristics.